

Enzyme-linked Immunosorbent Spot Protocol & Troubleshooting
The enzyme-linked immunosorbent spot (ELISpot) is a highly sensitive immunoassay technique for the detection of cytokines released by immune cells. It is often used as a common method for monitoring immune responses in humans and animals. In this assay, proteins secreted by cells are captured by specific antibodies. The target molecule is then detected using detection antibodies in a similar procedure to that used in ELISA. The end result is the appearance of visible spots on the surface.
ELISpot is more sensitive than the ELISA and can detect lower concentrations of cytokines. It is also very versatile and can be customized to detect a wide range of very specific secretions. We offer a standard ELISpot protocol that is easy to perform and quantify results. And you can use the search tool to find the products and services you need. Or contact us directly to discuss your specific ELISpot requirements.
Solutions and Reagents
| Stages | Solutions and Reagents |
| Antibody Fixation | Phosphate buffer (PBS), capturing antibody, dilution buffer, coating buffer, blocking buffer |
| Antibody Detection | Detection antibody, enzyme couple reagent |
| Detection | Substrate solution |
ELISpot Procedure
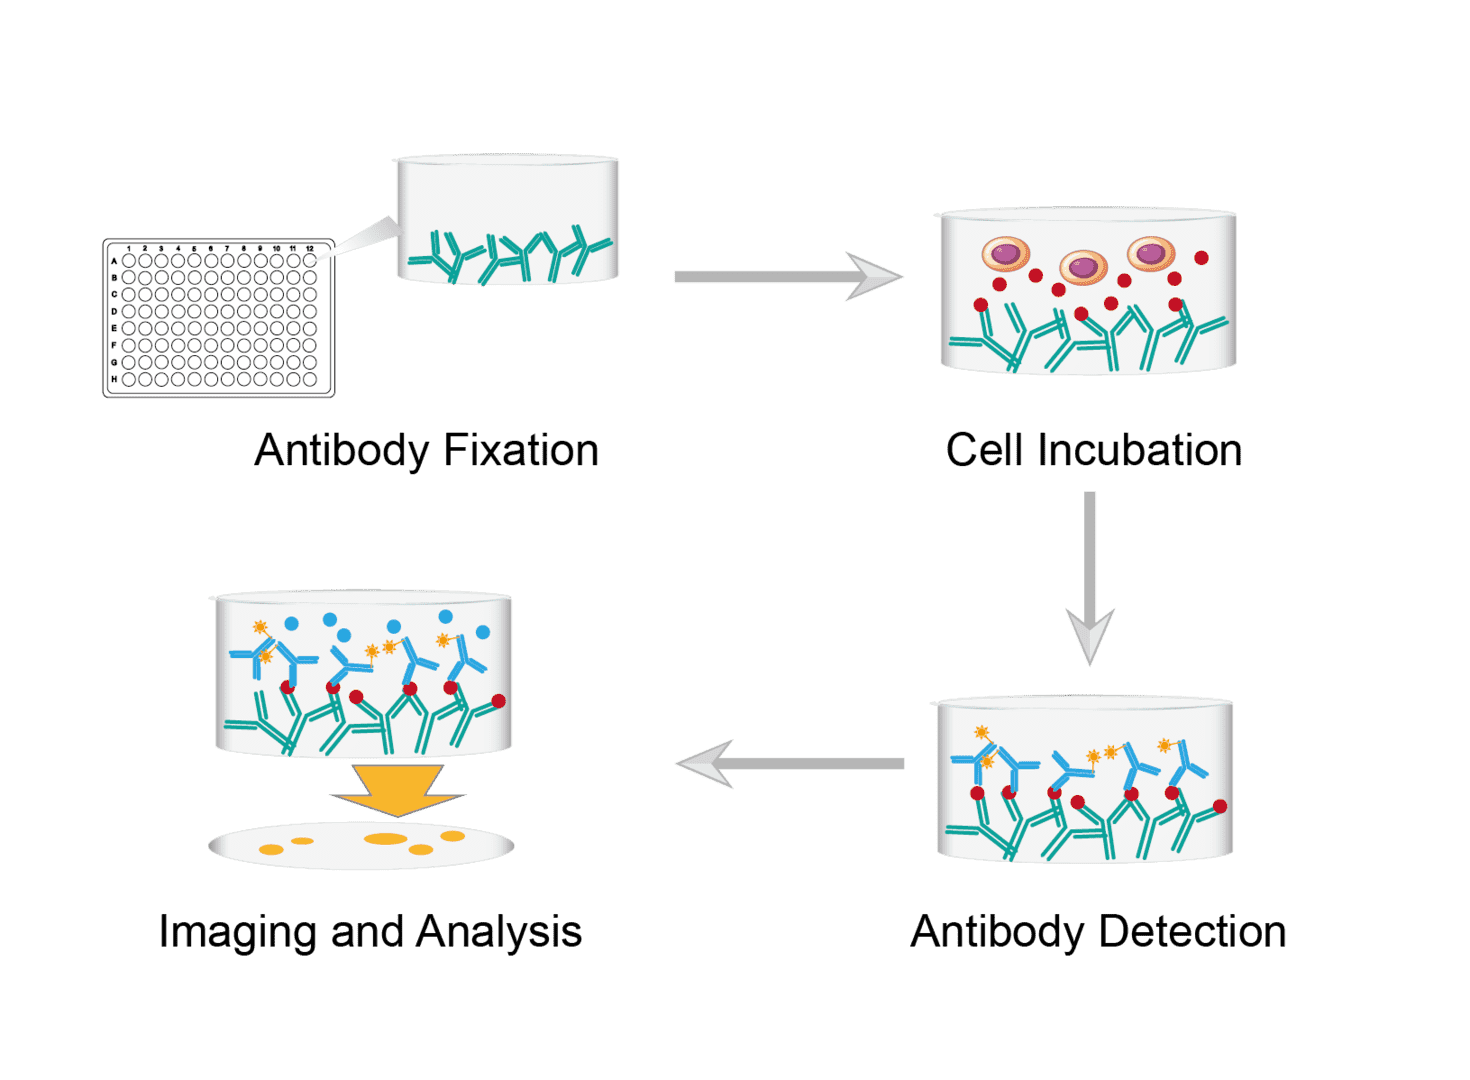
1. Antibody Fixation
Prepare them by immersing the PVDF membrane 96-well ELISPOT plates in ethanol for 30 seconds. Wash thoroughly with PBS to ensure complete removal of ethanol. Coat the 96-well plates with diluted capture antibody and incubate overnight at 4°C. Then empty the wells, wash repeatedly with PBS and dry. Finally, incubate each well with blocking buffer to prevent non-specific binding to the membrane. Repeat the washing and drying steps.
2. Cell Incubation
Capture and prepare cell samples. Count the cells and dilute them to the desired concentration. Add the cell suspension to the wells. Incubate overnight in the incubator. During the incubation period, the cells will secrete cytokines which bind to capture antibodies on the membrane immediately adjacent to the activated cells.
3. Antibody Detection
Wash repeatedly with PBS to remove cells and unbound cytokines. Dilute the biotinylated detection antibody, add to the wells and incubate. After incubation, wash several times with PBS to remove the non-specifically bound detection antibody. Then incubate again with enzyme couples to bind the detection antibody. Finally, repeat washes to ensure complete removal of excess reagents.
4. Imaging and Analysis
Add fresh substrate solution to each well. Carefully monitor the formation of spots. Observe that the reaction slows down and stop the reaction by gently washing the plate with PBS. Dry the plate to make the spots clear. Finally, take images and analyze and measure spot parameters.
Troubleshooting
Browse the troubleshooting guide below to find the answer to your ELISpot detection problem. For further assistance, please contact us.
No or few spots
-
Cell causes. One possibility is that not enough cells are being produced to secrete cytokines. You can optimize the number of cells per well. The number of cells should normally be between 1-2 × 10⁵ cells per well. Or take a cell stimulation operation. Use the stimulus to induce expression of the cytokine you are interested in.
Another possibility is a problem in the cell culture process. First ensure that the cells are cultured for a sufficient time. Next you can look for yellowing of the medium to determine apoptosis/necrosis. Finally remember to assess cell viability prior to addition. - Antibody causes. If the antigen concentration is very low or absent, other sources of antigen can be used to confirm whether the sample is the problem, or if it is due to something else, such as an antibody.
- Color development reagent causes. This may be the result of insufficient color development. Check color development to ensure that the developing reagent has been stored correctly and has not lost its activity.
Confluent spots
-
Cell causes. One problem is that cells are cultured for too long. The longer the cells are cultured, the more cytokines they secrete. This causes larger spots to start merging and become indistinguishable. You can reduce the time the cells are cultured, which is generally recommended to be no longer than 24 hours.
Another problem is that the cells are over-stimulated. Overstimulation will also cause the cells to secrete large amounts of cytokines. The solution is to reduce the amount of stimulant in the medium or the duration of stimulation. - Antibody causes. When fixing antibodies, you may not have controlled the amount of antibody resulting in too much antibody. We recommend reducing the primary antibody concentration.
Poorly defined spots
- Membrane causes. The possible cause is that the membrane has not been pretreated. The membrane must be pre-treated with ethanol, otherwise the result may be faint, undefined spots. It is difficult for us to distinguish between these spots. You need to ensure that the membrane is adequately pretreated with 35% ethanol. Wash several times afterwards with PBS.
- Plate movement causes. Do not allow the plate to move during cell incubation. This is because moving cells can create multiple spots. If possible, use a dedicated incubator during incubation. Do not tap the plate after the cells have been added.
- Antibody causes. The concentration of encapsulated antibody in the assay is not sufficient. Whether the capture antibody is too diluted or whether there are problems in the encapsulation step can affect the quality of the spot. You can increase the concentration of the encapsulating antibody.
White spots in the middle of normal spots
- Enzyme assay causes. A white dot in the middle of a normal spot means that the enzyme coupling has run out of substrate. Therefore, a higher concentration of secondary antibody and substrate is required.
High background
- Cell causes. Is the cell inoculation density optimized before the assay starts? We recommend optimizing the number of cells entered and the stimulus concentration beforehand. And have you estimated the percentage of live/dead cells prior to incubation? Large numbers of dead cells may lead to high background staining.
- Improperly dried plate causes. Wet membranes can show a dark blue background color. Dry the plate for a longer period of time before reading to keep it out of the light. This may help to increase the contrast between the background and the spot.
- Overdeveloping causes. Excessive amounts of biotinylated secondary antibodies or enzyme couplers may cause background. Incubation with the enzyme substrate for more than 1 hour may result in an increase in background color. You should reduce the development time or decrease the concentration of the reagents.
- Washing causes. This may be the result of an inadequate washing step. Washing prevents residues of secreted cytokines in the pre-culture medium. It is also important to carefully wash both sides of the membrane to flush out residual reagents. We recommend performing the recommended number of washing steps.
- Reagent causes. Antibodies, various reagents, various buffers should all be checked for quality before use. You can reduce background staining due to aggregation by filtering. And you need to ensure that the reagents are sterile.
Inconsistency in results between wells
- Cell causes. Ensure that a well-mixed suspension of single cell samples is used when adding cells to the wells.
For research use only. Not intended for any clinical use.
Send Inquiry
This site is protected by reCAPTCHA and the Google Privacy Policy and Terms of Service apply.