

Immunohistochemistry-Paraffin Protocol & Troubleshooting
Immunohistochemistry (IHC) protocols allow localization and measurement of specific proteins in tissue. Paraffin-embedded tissue sections sometimes allow for better preservation of tissue morphology. Paraffin sections also allow you to work with larger tissues and store them more easily. Here we will show you how to perform IHC using paraffin-embedded sections (IHC-P). It consists of a series of procedures including fixation, paraffin embedding, sectioning, and staining of the tissue.
We provide you with a simple protocol for IHC-P that you can refer to, which contains some troubleshooting tips and hints. These methods for paraffin section preparation and immunohistochemical staining should help put you on the right experimental track.
Solutions and Reagents
| Stages | Solutions and Reagents |
| Section Preparation | Washing buffer, neutral buffered formalin, ethanol solution, xylene solution, liquid paraffin, antigen retrieval buffer |
| Antibody Staining | Blocking buffer, primary antibody, labeled secondary antibody, dilution buffer, washing buffer, incubation buffer, chromogen |
| Mounting | Mounting solution, washing buffer |
Immunohistochemistry-Paraffin Procedure
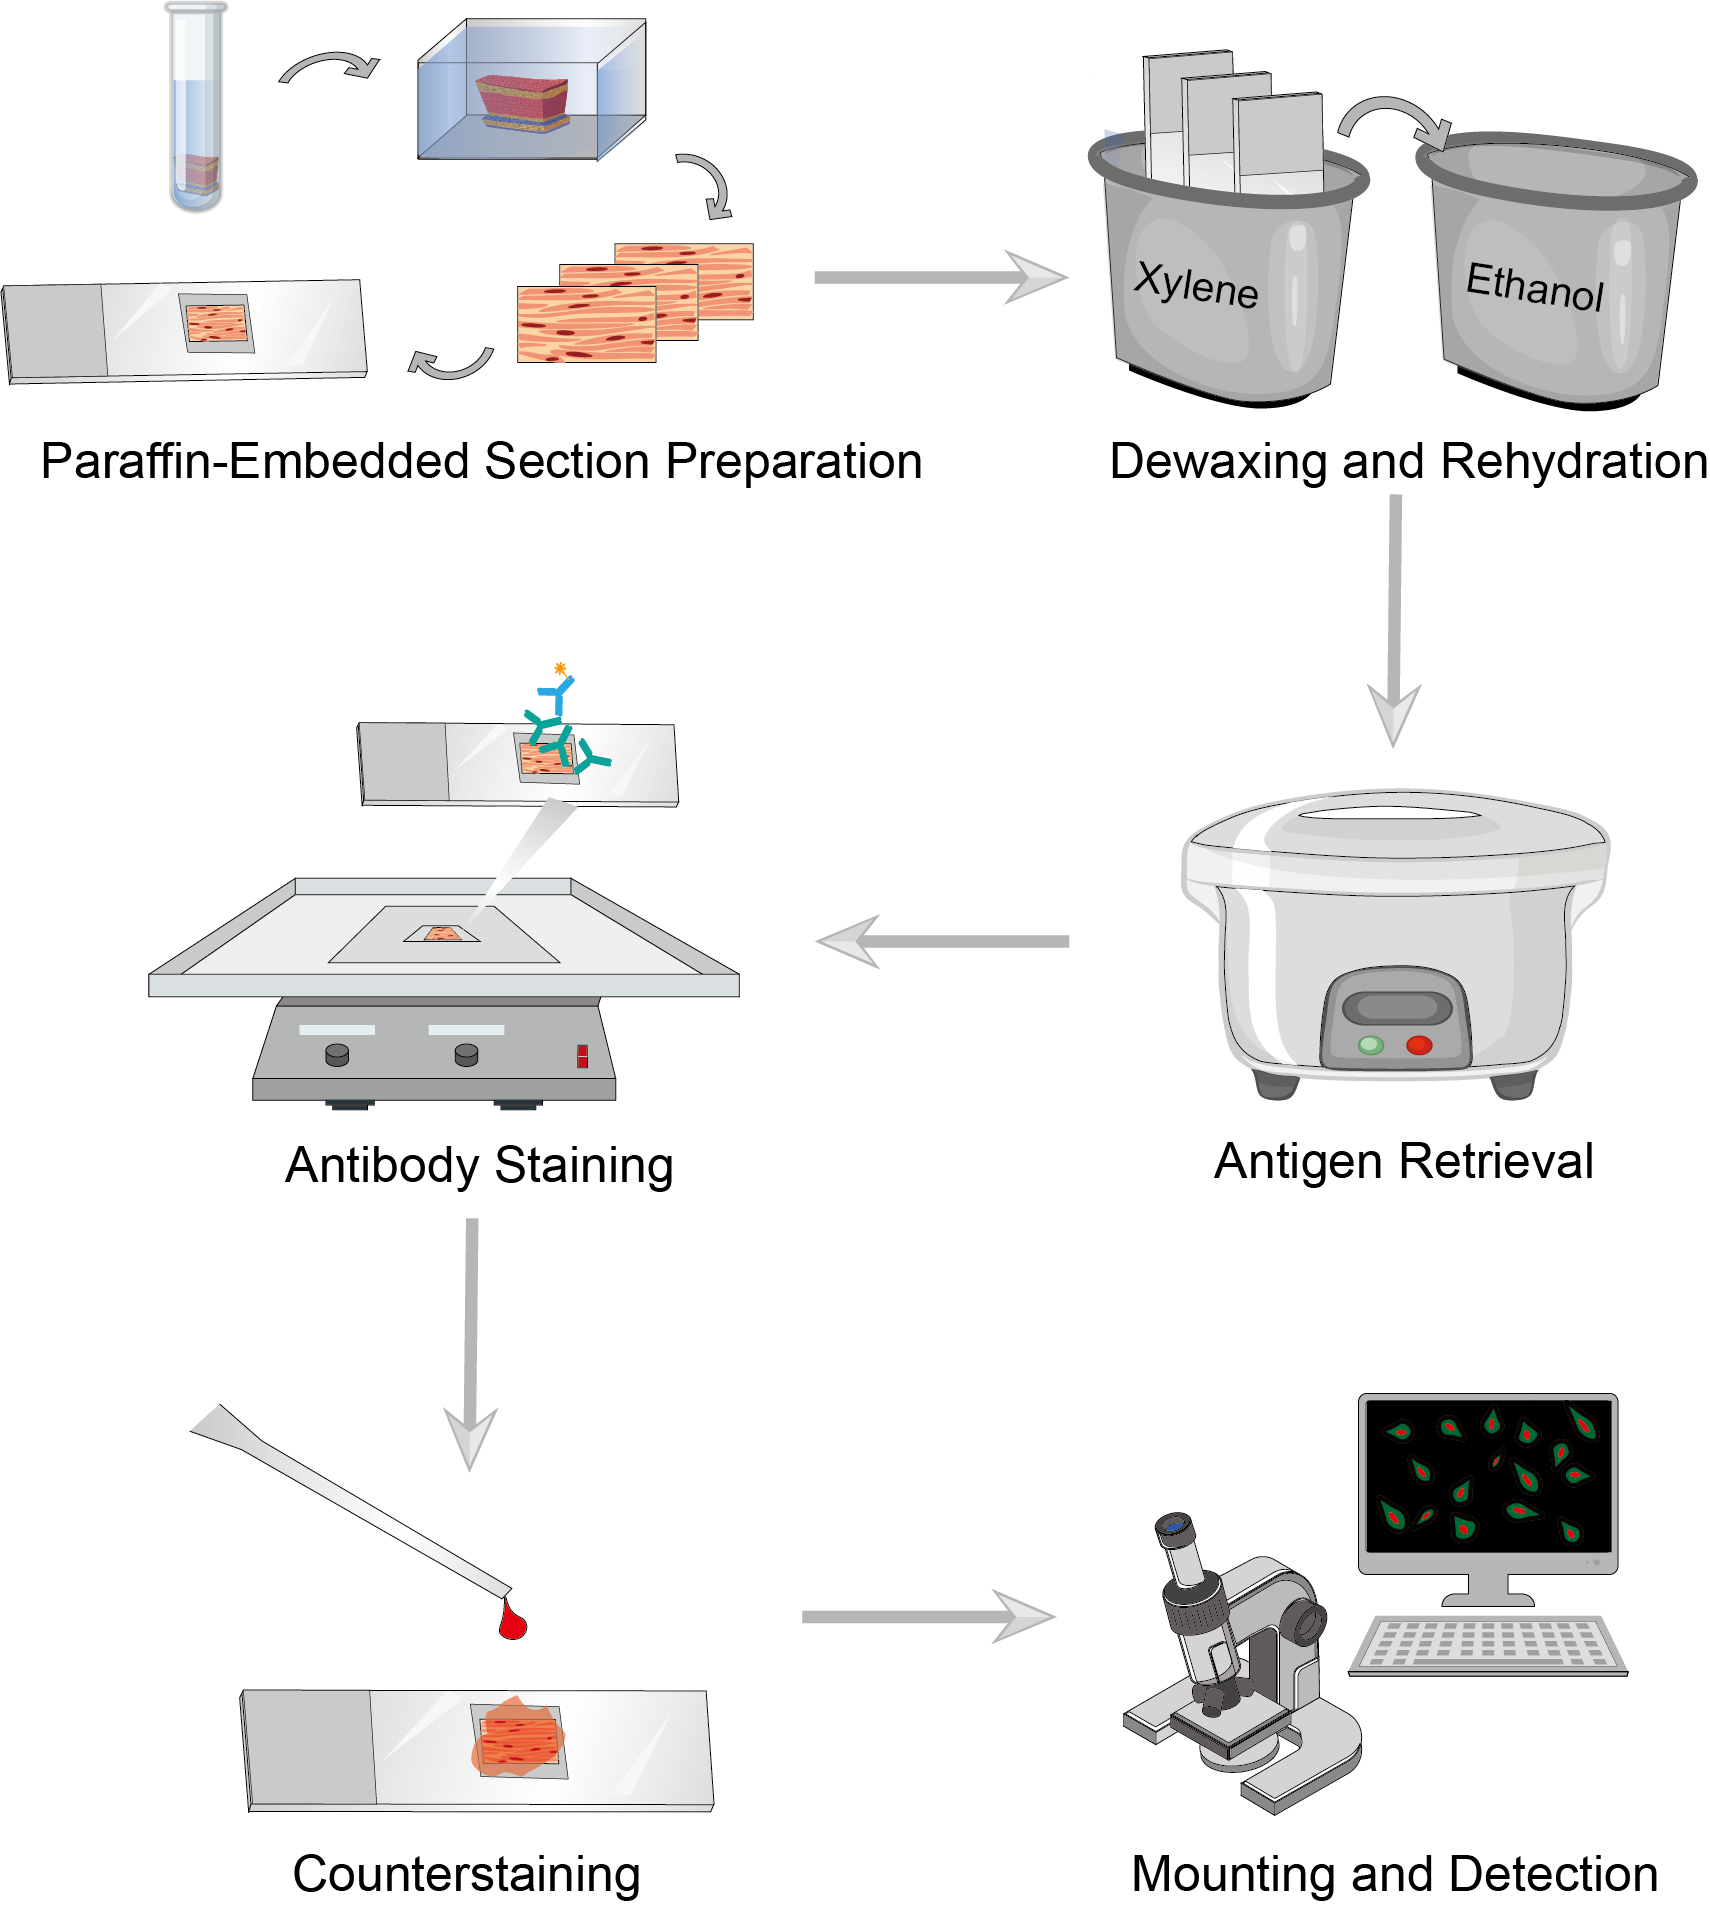
1. Paraffin-Embedded Section Preparation
Prepare freshly dissected tissues and wash and cut them for use. Soak the tissue with a fixative for fixation. Neutral buffered formalin (NBF) is the usual fixative and the fixation time depends on the size of the tissue block and the type of tissue. Wash the tissues with buffer at the end of fixation. Dehydrate the tissues by soaking them several times with gradient concentrations of ethanol. Then wash the tissue several times using xylene. And immerse the tissue several times in liquid paraffin and keep it warm. Pour the paraffin wax into a mold, then transfer the tissue quickly into the mold and cool it at room temperature until the paraffin wax solidifies. Slice the paraffin-embedded tissues and incubate the sections in water to spread them. Mount the tissue sections on slides, dry them, and set them aside.
2. Dewaxing and Rehydration
Incubate the slides in xylene solution and repeat several times to ensure that the sections are completely dewaxed. Transfer the slides to ethanol solution and wash them several times at reduced concentrations. Then wash with washing buffer to remove the ethanol. Be sure not to allow the slide to dry out during this process.
3. Antigen Retrieval
Perform antigen retrieval to reveal antigenic epitopes. The most commonly used antigen retrieval is heat-induced epitope restoration (HIER). There are various methods of heating after the addition of antigen retrieval buffer, such as microwaving and boiling. You can read more about antigen retrieval to help determine the best conditions for your sample. When finished, cool the slide and wash it.
4. Antibody Staining
Select the ideal blocking reagent and incubate the sample with the blocking buffer. Incubation time and temperature are set on a case-by-case basis. When finished, wash the slide and remove the blocking buffer. For direct labeling, dilute the primary antibody appropriately and transfer the slide to the incubation buffer containing the primary antibody for incubation. Then wash the slides. For indirect assays, transfer the sections to the incubation buffer containing the secondary antibody and continue incubation. Wash the slide after completion to remove excess solution. Add the appropriate dilution of chromogenic agent to the slides and incubate away from light.
5. Counterstaining
The counterstaining step is optional. Counterstaining provides contrast with antibody staining to better distinguish the target signal. Select the ideal counterstains, incubate the sections, and rinse them upon completion.
6. Mounting and Detection
After staining, use the appropriate sealing solution to mount coverslips and seal the samples. Mounted slides can be stored permanently at room temperature. Observe the color of the antibody stain in the tissue section under the microscope.
Troubleshooting
IHC-P is a procedure for sectioning and staining tissue embedded in paraffin. Although it sounds easy, the reality is that there are many possible combinations of tissue types, antibodies, and assays, which can easily lead to various problems. If you need to perform some troubleshooting, please refer to our extensive troubleshooting guide. We solve your problem by adjusting a relatively small number of variables.
Tissue section problem
- Uneven tissue embedding problem. The uneven surface of the tissue section may result in the lost of important information. You should ensure that the blade is sharp enough and adjust the cutting speed to cut thicker sections.
- Tissue section detachment problem. Use positively charged or coated slides, or replace them with new slides. Be gentle when using antigen retrieval methods and avoid over-stirring the slide. During the fixation step, you can change the fixative or increase the fixation time.
No or inadequate staining
- Antigen causes. If the test slide is inadequately stained or unstained, while the positive control slide is adequately stained, the antigen may be the problem. The antigen is not present in the test tissue or is present but at a level below the limit of detection. Consider using an amplification procedure or increasing the primary antibody concentration, incubation time, or temperature. If antigen coverage is caused by over-fixation or under-fixation of tissue sections, a modified antigen retrieval protocol is required.
- Antibody causes. If the positive control is weak or unstained and the test slide is also weak or unstained, the antibody may be the cause. Check the antibody, including conditions such as dilution concentration, incubation time, and temperature. Pay attention to check if the secondary antibody and primary antibody are compatible because the test requires the use of a secondary antibody that will interact with the primary antibody.
- Reagent causes. Check and make sure that the buffer solution is not contaminated, and that the wash time is appropriate as a long-time wash can cause a reduced signal. It is necessary to check the relevant reagents such as buffers and chromogenic agents, and expiration dates, storage parameters, pH, and order of use are all included.
- Microscope causes. Check microscope parameter settings and increase the exposure time of the camera.
High background
- Section causes. Consider first if the tissue section is too thick and thinner sections can be prepared. Then check if sections are adequately fixed or if necrosis and autolysis are present. If any of these conditions are present, avoid sampling necrotic areas and ensure that the tissue is properly fixed. As well, inappropriate kinds of or the excess use of section adhesives can affect the background. Throughout the process, check and ensure that tissue sections are not dry.
- Dewaxing causes. You should repeat the dewaxing step several times to completely remove the paraffin from the sample.
- Antigen retrieval causes. You may have used an inappropriate antigen retrieval method. Please re-evaluate the antigen retrieval conditions and optimize the antigenicity of your sample.
- Blocking causes. Possible reasons for this are inadequate blocking of endogenous enzyme activity, biotin, or protein during the blocking phase. You can increase the concentration of the blocking agent or use a different blocking agent. In addition, you need to be aware that the blocking buffer should be made from a blocking serum of the same species.
- Primary antibody causes. Improper antibody concentration causes high background. You can re-titrate the primary antibody and select the appropriate concentration. Check the primary antibody incubation time, too long time can also cause this problem. You can shorten the incubation time. Clean sections and no antibody solution remaining should be ensured as well.
- Secondary antibody causes. As with the primary antibody, check the secondary antibody and label concentration and incubation time. It is important to note that the secondary antibody chosen needs to be unbound to tissue immunoglobulins. Clean sections and no antibody solution remaining should be ensured as well.
- Chromogen causes. If the chromogen concentration is too high and the reaction time is too long, you need to reduce the chromogen concentration and shorten the incubation time. It is also possible that the counterstain is masking the IHC reaction, and we suggest you replace a different counterstain. Clean sections and no excess stain remaining should be ensured as well.
We hope that this information about IHC-P above is useful to you as a reference guide. If you need more help with your experiments, please contact us for further assistance.
Products with Tested Data
At Creative Biolabs, we are dedicated to providing high-quality antibodies for various research applications. Each product in our extensive range has been rigorously tested to ensure superior reliability and efficacy. To showcase the performance of our antibodies, we have conducted numerous experiments using Immunohistochemistry-Paraffin (IHC-P). Below, you will find a table listing a selection of our antibody products along with images from these experiments, demonstrating their proven reliability.
| Product Name | Catalog Number | Target | Image | Description |
|---|---|---|---|---|
| Rabbit Anti-BRAF (V600E) Recombinant Antibody (clone B16-U) | ZG-0301U | BRAF (V600E) |

|
Result of the Leica BOND Max immunohistochemical staining protocol on a formalin fixed and paraffin embedded human melanoma tissues (4 μm sections) with Anti-BRAF V600-E (ZG-0301U) antibody. The fine granular brown staining in the cytoplasm of the tumor cells, highlights specifically V600-E mutation of BRAF protein, while dark brown dots represent melanin pigment deposition. |
| Rabbit Anti-ACTA2 Recombinant Antibody (clone M16-L) | ZG-0297U | ACTA2 |

|
Alpha smooth muscle actin positivity in the vessel walls of submucosa of small intestine tissue. Formalin fixed, paraffin embedded human tissue (4 μm section) stained with ZG-0297U antibody. |
| Rabbit Anti-C3 Recombinant Antibody (clone E28-P) | ZG-0302U | C3 |

|
Skin biopsy from the lesion of the early pemphigus vulgaris (without blister formation), stained with anti-C3d complement (ZG-0302U) antibody shows strong positive intraepidermal intercellular immunostaining. Formalin fixed, paraffin embedded human tissue (4 μm section) stained. |
| Rabbit Anti-CD7 Recombinant Antibody (clone C21-Q) | ZG-0315U | CD7 |

|
CD7 expression in T-lymphocytes of the palatine tonsil. Formalin fixed, paraffin embedded human tissues (4 μm sections) stained with anti-CD7 monoclonal antibody. |
| Rabbit Anti-CHGA Recombinant Antibody (clone N28-A) | ZG-0318U | CHGA |

|
Cytoplasmic expression of chromogranin A in normal pancreatic islets of Langerhans. Formalin fixed, paraffin embedded human tissue (4 μm section) stained with anti-chromogranin A antibody. |
| Rabbit Anti-CCND1 Recombinant Antibody (clone E16-l) | ZG-0319U | CCND1 |

|
Intestinal Mantle-Cell Lymphoma showing nuclear cyclin D1 positivity. Formalin fixed, paraffin embedded human tissue (4 μm section) stained with anti-cyclin D1 monoclonal antibody. |
| Rabbit Anti-LMP-1 Recombinant Antibody (clone S20-D) | ZG-0330U | LMP-1 |

|
HRS cells of the classical Hodgkin Lymphoma showing cytoplasmic expression of the EBV LMP-1 protein. Formalin fixed, paraffin embedded human tissue (4 μm section) stained with anti-EBV LMP-1 monoclonal antibody. |
| Rabbit Anti-IGLC1 Recombinant Antibody (clone K22-Y) | ZG-0349U | IGLC1 |

|
Expression of the Lambda Light Chain immunoglobulin in the plasma cells of the palatine tonsil. Formalin fixed, paraffin embedded human tissues (4 μm sections) stained with anti-Human Lambda light chain monoclonal antibody. |
| Rabbit Anti-MSH2 Recombinant Antibody (clone N29-D) | ZG-0369U | MSH2 |

|
Retained MSH2 expression in the colorectal adenocarcinoma. Formalin fixed, paraffin embedded human tissue (4 μm section) stained with anti-human MSH2 antibody. |
| Rabbit Anti-KIT Recombinant Antibody (clone R21-V) | ZG-0305U | KIT |

|
Membranous CD117 positivity in the classical seminoma. Formalin fixed, paraffin embedded human tissues (4 μm sections) stained with anti-CD117 monoclonal antibody. |
| Rabbit Anti-CR2 Recombinant Antibody (clone Q22-S) | ZG-0310U | CR2 |

|
Expression of CD21 in follicular dendritic cells-lymphoid follicle of the tonsil. Formalin fixed, paraffin embedded human tissue (4 μm section) stained with anti-CD21 monoclonal antibody. |
| Rabbit Anti-CD34 Recombinant Antibody (clone Q19-E) | ZG-0313U | CD34 |

|
Focal CD34 positivity in the GIST (gastrointestinal stromal tumor) of small intestine. Formalin fixed, paraffin embedded human tissues (4 μm sections) stained with ZG-0313U antibody. |
| Rabbit Anti-KRT8 Recombinant Antibody (clone R15-K) | ZG-0327U | KRT8 |

|
CK8 expression in T-lymphocytes of the palatine tonsil. Formalin fixed, paraffin embedded human tissue (4 μm section) stained with anti-Cytokeratin 8 monoclonal antibody. |
| Rabbit Anti-C4A Recombinant Antibody (clone A24-T) | ZG-0303U | C4A |

|
Transplanted kidney tissue stained with anti-C4d complement (ZG-0303U) antibody shows diffuse strong positive immunostaining of dilated peritubular moderate capillaries, indicating acute antibody mediated rejection. Formalin fixed, paraffin embedded human tissues (4 μm sections) stained with anti-C4d complement monoclonal antibody. |
| Rabbit Anti-MS4A1 Recombinant Antibody (clone E17-P) | ZG-0309U | MS4A1 |

|
Chronic lymphocytic leukaemia cells in the bone marrow biopsy, showing CD20 expression. Formalin fixed, paraffin embedded human tissues (4 μm sections) stained with anti- CD20 monoclonal antibody. |
| Rabbit Anti-DES Recombinant Antibody (clone E18-V) | ZG-0328U | DES |

|
Desmin expression detected in the uterine leiomyoma tissue with ZG-0328U antibody. Formalin fixed, paraffin embedded human tissue (4 μm section) stained. |
| Rabbit Anti-PGR Recombinant Antibody (clone X22-C) | ZG-0366U | PGR |

|
Progesterone receptor (PR) expression in the ductal carcinoma of the breast. Formalin fixed, paraffin embedded human tissues (4 μm sections) stained with anti-PR monoclonal antibody. |
| Rabbit Anti-CDH1 Recombinant Antibody (clone N20-D) | ZG-0304U | CDH1 |

|
Immunohistochemical staining patterns of formalin fixed and paraffin embedded human breast carcinoma tissue (4 μm sections) with Anti-Cadherin1 (ZG-0304U) antibody, using Leica Bond-Max. The invasive ductal breast carcinoma tissues show strong membranous Cadherin1 expression. |
| Rabbit Anti-KRT19 Recombinant Antibody (clone E16-L) | ZG-0324U | KRT19 |

|
Monophasic spindle cell synovial sarcoma expressing CK19. Formalin fixed, paraffin embedded human tissues (4 μm sections) stained with anti-Cytokeratin 19 monoclonal antibody. |
| Rabbit Anti-ALPP Recombinant Antibody (clone P16-D) | ZG-0351U | ALPP |

|
Diffuse cytoplasmic PLAP positivity in the typical seminoma. Formalin fixed, paraffin embedded human tissue (4 μm section) stained with anti-PLAP monoclonal antibody. |
| Rabbit Anti-MUC1 Recombinant Antibody (clone G22-L) | ZG-0352U | MUC1 |

|
Epithelial membrane antigen expression in sebaceous glands of the skin, stained with anti-CD227 antibody. Formalin fixed, paraffin embedded human tissues (4 μm sections) stained. |
| Rabbit Anti-PMEL Recombinant Antibody (clone P14-V) | ZG-0353U | PMEL |

|
Diffuse anti Melanosome antibody positivity in the cutaneous malignant melanoma. Formalin fixed, paraffin embedded human tissue (4 μm section) stained with anti-Melanosome monoclonal antibody. |
| Rabbit Anti-S100A1 Recombinant Antibody (clone D28-E) | ZG-0356U | S100A1 |

|
S-100 protein expression in the cutaneous malignant melanoma. Formalin fixed, paraffin embedded human tissue (4 μm section) stained with anti-S-100 monoclonal antibody. |
| Rabbit Anti-NKX2-1 Recombinant Antibody (clone G21-G) | ZG-0364U | NKX2-1 |

|
Nuclear expression of TTF1 in lung adenocarcinoma. Formalin fixed, paraffin embedded human tissues (4 μm sections) stained with anti-TTF1 antibody. |
| Rabbit Anti-FUT4 Recombinant Antibody (clone E26-A) | ZG-0306U | FUT4 |

|
Expression of CD15 in HRS cells of classical Hodgkin lymphoma. Formalin fixed, paraffin embedded human tissue (4 μm section) stained with anti-CD15 monoclonal antibody. |
| Rabbit Anti-CD163 Recombinant Antibody (clone K20-T) | ZG-0307U | CD163 |

|
CD163-positive macrophages in the abscess of the liver. Formalin fixed, paraffin embedded human tissues (4 μm sections) stained with anti-CD163 monoclonal antibody. |
| Rabbit Anti-CD1A Recombinant Antibody (clone L21-A) | ZG-0308U | CD1A |

|
CD1a expression in dendritic cells of the epidermis (langerhans cells). Formalin fixed, paraffin embedded human tissues (4 μm sections) stained with anti-CD1a monoclonal antibody. |
| Rabbit Anti-CD5 Recombinant Antibody (clone A25-G) | ZG-0314U | CD5 |

|
CD5 positive T-lymphocytes of the lymph node. Formalin fixed, paraffin embedded human tissues (4 μm sections) stained with anti-CD5 monoclonal antibody. |
| Rabbit Anti-KRT16 Recombinant Antibody (clone R20-S) | ZG-0321U | KRT16 |

|
CK16 expressed in the luminal cells of the sweat glands of the human skin. Formalin fixed, paraffin embedded human tissue (4 μm section) stained with anti-Cytokeratin 16 monoclonal antibody. |
| Rabbit Anti-CD8A Recombinant Antibody (clone P17-V) | ZG-0316U | CD8A |

|
CD8 expression in T-lymphocytes of the palatine tonsil. Formalin fixed, paraffin embedded human tissue (4 μm section) stained with anti-CD8 monoclonal antibody. |
| Rabbit Anti-ERBB2 Recombinant Antibody (clone A24-V) | ZG-0317U | ERBB2 |

|
C-erbB-2 protein expression (3+) in adenocarcinoma of stomach. Formalin fixed, paraffin embedded human tissues (4 μm sections) stained with anti-C-erbB-2 antibody. |
| Rabbit Anti-KRT17 Recombinant Antibody (clone V21-R) | ZG-0322U | KRT17 |

|
CK17 expressed in the skin-adnexal epithelial cells. Formalin fixed, paraffin embedded human tissue (4 μm section) stained with anti-Cytokeratin 17 monoclonal antibody. |
| Rabbit Anti-KRT18 Recombinant Antibody (clone R20-H) | ZG-0323U | KRT18 |

|
CK18 expression in the adenosquamous carcinoma of the human pancreas. Formalin fixed, paraffin embedded human tissue (4 μm section) stained with anti-Cytokeratin 18 monoclonal antibody. |
| Rabbit Anti-IGKC Recombinant Antibody (clone A21-Y) | ZG-0347U | IGKC |

|
Expression of the Kappa Light Chain immunoglobulin in the plasma cells of the palatine tonsil. Formalin fixed, paraffin embedded human tissues (4 μm sections) stained with anti-Human Kappa light chain monoclonal antibody. |
| Rabbit Anti-EGFR Recombinant Antibody (clone A20-E) | ZG-0365U | EGFR |

|
Membranous and cytoplasmic EGFR expression in the colorectal adenocarcinoma. Formalin fixed, paraffin embedded human tissue (4 μm section) stained with anti-EGFR monoclonal antibody. |
| Rabbit Anti-SYP Recombinant Antibody (clone Q21-Q) | ZG-0377U | SYP |

|
Cytoplasmic expression of synaptophysin in neuroendocrine tumor of the pancreas (NET, grade 1). Formalin fixed, paraffin embedded human tissues (4 μm sections) stained with anti-Synaptophysin monoclonal antibody. |
| Rabbit Anti-CHAF1B Recombinant Antibody (clone E17-L) | ZG-0388U | CHAF1B |

|
Nuclear expression of p60 protein in colorectal adenocarcinoma, detected with anti-p60 monoclonal antibody. Formalin fixed, paraffin embedded human tissues (4 μm sections) stained. |
| Rabbit Anti-CD274 Recombinant Antibody (clone Y19-I) | ZG-0393U | CD274 |

|
Membranous and cytoplasmic positivity of PD-L1 in epithelioid histiocytes and multinucleated giant cells in tuberculous lymphadenitis (alkaline pohosphatase chromogen was used in this case). |
| Mouse Anti-CDKN2A Recombinant Antibody (clone R15-A) | ZG-0394U | CDKN2A |

|
High grade squamous intraepithelial lesion of the uterine cervix stained with mouse anti-p16 (clone R15-A) monoclonal antibody, shows significant nuclear and cytoplasmic positivity of target cells. Formalin fixed, paraffin embedded human tissues (4 μm sections) stained. |
| Rabbit Anti-TP53 Recombinant Antibody (clone M26-A) | ZG-0345U | TP53 |

|
Ovarian high grade serous carcinoma with diffuse strong nuclear p53 expression. Formalin fixed, paraffin embedded human tissue (4 μm section) stained with anti-p53 monoclonal antibody. |
| Rabbit Anti-ESR1 Recombinant Antibody (clone S21-V) | ZG-0355U | ESR1 |

|
Diffuse and strong estrogen receptor expression in mucinous breast carcinoma, stained with anti-ER antibody. Formalin fixed, paraffin embedded human tissue (4 μm section) stained. |
| Rabbit Anti-AMACR Recombinant Antibody (clone Q17-L) | ZG-0389U | AMACR |

|
Expression of P504S (AMACR) in papillary renal cell carcinoma tissue. Formalin fixed, paraffin embedded human tissues (4 μm sections) stained with ZG-0389U antibody. |
| Rabbit Anti-KLK3 Recombinant Antibody (clone L15-V) | ZG-0395U | KLK3 |

|
Immunohistochemical staining patterns of formalin fixed and paraffin embedded human prostate tissue (4 μm sections) with Anti-PSA antibody using Ventana BenchMark. The prostate gland tissues show a strong distinct cytoplasmic PSA expression. |
| Rabbit Anti-FCER2 Recombinant Antibody (clone E28-S) | ZG-0311U | FCER2 |

|
CD23 expression in follicular dendritic cells of the lymph node. Formalin fixed, paraffin embedded human tissue (4 μm section) stained with anti-CD23 antibody. |
| Rabbit Anti-CD3E Recombinant Antibody (clone N26-R) | ZG-0312U | CD3E |

|
CD3 positivity in T-lymphocytes of the normal lymph node, stained with anti-CD3 antibody. Formalin fixed, paraffin embedded human tissue (4 μm section) stained. |
| Rabbit Anti-KRT7 Recombinant Antibody (clone R17-S) | ZG-0326U | KRT7 |

|
Ductal pancreatic adenocarcinoma showing diffuse CK7 positivity. Formalin fixed, paraffin embedded human tissues (4 μm sections) stained with anti-Cytokeratin 7 monoclonal antibody. |
| Rabbit Anti-PTPRC Recombinant Antibody (clone E19-G) | ZG-0350U | PTPRC |

|
CD45 (leukocyte common antigen, LCA) expression in lymphoid cells of the palatine tonsil. Formalin fixed, paraffin embedded human tissues (4 μm sections) stained with anti-CD45 monoclonal antibody. |
| Rabbit Anti-MLANA Recombinant Antibody (clone A19-P) | ZG-0354U | MLANA |

|
Diffuse Melan A positivity in the cutaneous malignant melanoma. Formalin fixed, paraffin embedded human tissue (4 μm section) stained with anti-Melan A monoclonal antibody. |
| Rabbit Anti-MDM2 Recombinant Antibody (clone E22-L) | ZG-0396U | MDM2 |

|
Immunohistochemical staining patterns of formalin fixed and paraffin embedded human liposarcoma tissue (4 μm sections) with Anti - mdm2 antibody using Ventana BenchMark. The liposarcoma tissues show strong nuclear mdm2 expression. |
| Rabbit Anti-SARS-COV-2 S Recombinant Antibody (clone Q25-L) | ZG-0401U | SARS-CoV-2 S |

|
Immunohistochemical staining patterns of formalin fixed and paraffin embedded human Covid-19 infected lung tissue (4 μm sections) with Anti - SARS-CoV-2 Spike glycoprotein antibody. Antibody SARS-CoV-2 Spike glycoprotein stains cytoplasm of individual pneumocytes or larger clusters of affected cells. |
For research use only. Not intended for any clinical use.
Send Inquiry
This site is protected by reCAPTCHA and the Google Privacy Policy and Terms of Service apply.