

Electron Microscopy Protocol & Troubleshooting
Electron microscopes are very powerful tools for visualizing biological samples. They allow scientists to look at cells, tissues and small organisms in great detail. With electron microscopes, scientists and researchers can see the micron and nanoscale world around us.
The two most common types of electron microscopes are transmission electron microscopy (TEM) and scanning electron microscopy (SEM). In general, the SEM is ideal if you need to see a relatively large area and only need surface detail. If you need internal details of a small sample with near atomic resolution, the TEM must be used.
To observe these biological samples, one must go through a preparation step to help the sample withstand the environment inside the microscope. Creative Biolabs describes a common protocol for electron microscopy, including the process of preparing specimens of cells, tissues and other samples, to follow standard procedures for life science analysis with the aid of a microscope.
Solutions and Reagents
| Stages | Solutions and Reagents |
| Sample Preparation | Phosphate buffer (PBS), aldehyde fixative, fixative buffer, washing buffer, ethanol solution |
Electron Microscopy Procedure
Electron microscopes can excite electrons to form images, providing amazing levels of fine magnification. Here, we describe the general operation of electron microscopy using SEM as an example for reference. Please note that we recommend discussing this with our staff prior to starting your electron microscopy protocol.
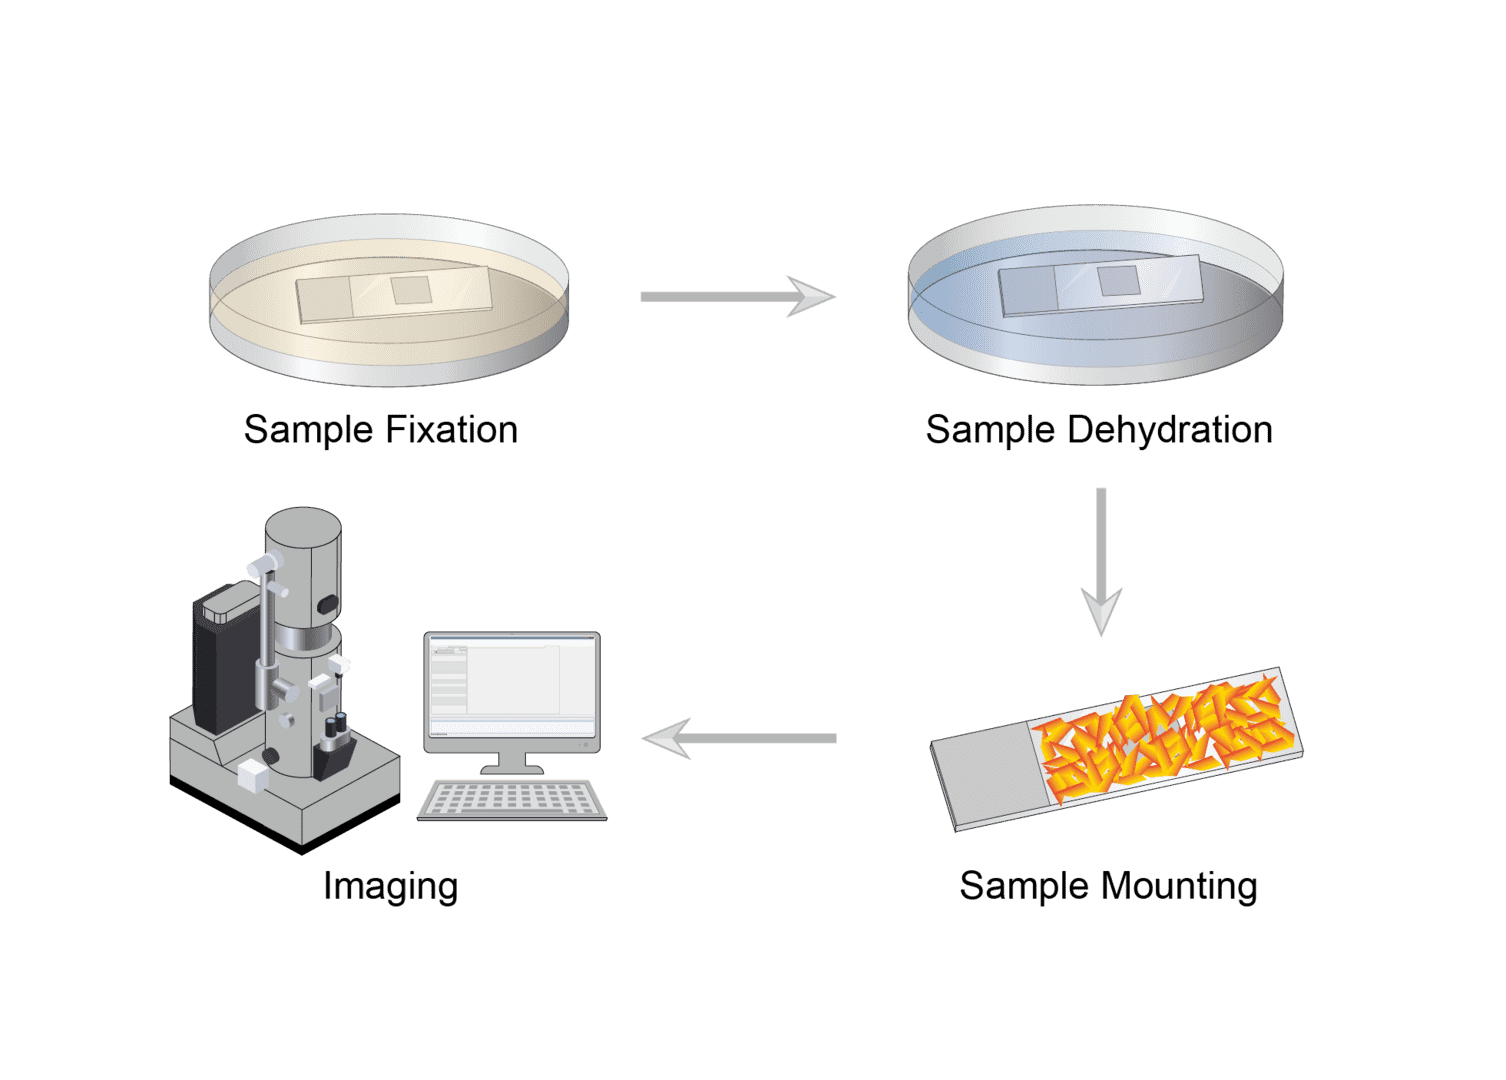
1. Sample Fixation
There are many variations of fixation procedures depending on the type of sample to be examined. First choose the appropriate aldehyde fixative to fix the sample for at least one hour. For tissue samples, this can be done after initial fixation, rinsing in buffer and post-fixing in osmium tetroxide for at least 1 hour. After fixation, rinse in buffer.
2. Sample Dehydration
After rinsing in buffer, dehydrate the samples through a series of graded 50-100% alcohols. After dehydration, perform drying. You can choose between critical point drying (CPD) or chemical drying.
3. Sample Mounting
Mount the sample on a specimen holder and sputter coat it with Au/Pd. The SEM sample is coated with a thin layer of metal (usually gold or gold-palladium). The metal coating makes the sample electrically conductive and draws electrons away from the bombarded sample.
4. Imaging
Image and observe gold-plated samples with a scanning electron microscope. The imaging is performed under high vacuum and accelerating voltage.
Troubleshooting
The electron microscope is a precision instrument, and attention must be paid to sample preparation before observing the sample. If there is a problem with the sample or improper preparation, not only can we not get the desired effect, but also will cause damage to the electron microscope and affect the performance. Therefore, you should pay attention to the following issues when preparing samples.
Undried sample
The samples need to be dry and free of water and volatile solvents. If the sample contains water or volatile solvents, they may evaporate in the vacuum environment causing the electron microscope filament to malfunction.
- Drying process. For samples containing water or volatile solvents, they must undergo a drying step before being placed under observation. To ensure that the surface is not damaged during sample drying, we recommend CPD or freeze-drying. You can also use the appropriate fixation, dehydration, and drying procedures to ensure that the sample is shaped and adequately dried.
Contaminated sample
- Operation and instrumentation. Samples should be kept clean and dust-free during preparation, pick-up and storage. Therefore, gloves, instruments, etc. should also be kept clean.
- Blok sample. Before putting in the electron microscope, it needs to be rinsed with water, then ultrasonically cleaned with an organic solvent such as ethanol and dried.
- Powder sample. The powder sample needs to be of uniform thickness, have a flat surface, and be firmly adhered to the conductive adhesive. Prior to placement in the electron microscope, the sample needs to be purged with a large airflow to remove unglued sample particles.
Poor electrical conductivity
- Non-conductive sample. For non-conductive samples, carbon or metal spraying can be used to improve the conductivity of the material and enhance the sample signal emission. For samples that cannot be sprayed, the sample can be observed in low vacuum mode.
Poor thermal stability
- Thermosensitive sample. Some thermosensitive materials are mostly biological and organic polymer samples. Coating on the surface can improve sample stability. Smaller accelerating voltages and beam intensities are also tried to be selected for observation.
Magnetic sample
- Magnetic sample. Magnetic samples can affect the electron beam trajectory and cause image anomalies. Extra care should be taken when observing magnetic materials. Demagnetization must be performed for more magnetic samples.
After checking the reasonable troubleshooting steps, if you still have problems, you can contact us for inquiries.
Products with Tested Data
At Creative Biolabs, we are dedicated to providing high-quality antibodies for various research applications. Each product in our extensive range has been rigorously tested to ensure superior reliability and efficacy. To showcase the performance of our antibodies, we have conducted numerous experiments using Electron Microscopy. Below, you will find a table listing a selection of our antibody products along with images from these experiments, demonstrating their proven reliability.
| Product Name | Catalog Number | Target | Image | Description |
|---|---|---|---|---|
| Mouse Anti-Cowdria ruminantium Recombinant Antibody (clone 4F10B4) | ZG-467C | Cowdria ruminantium |

|
Electron photomicrograph showing Cr32-specific epitope detection on the surface of elementary bodies of Cowdria by immunogold labeling with Mab 4F10B4. |
For research use only. Not intended for any clinical use.
Send Inquiry
This site is protected by reCAPTCHA and the Google Privacy Policy and Terms of Service apply.