

Immunohistochemistry Protocol & Troubleshooting
Immunohistochemistry (IHC) is a technique that detects antigens in tissue sections by immunological and chemical reactions. It uses specific binding between antibodies and antigens and chromogenic color development to detect and localize specific antigens in tissues. The technique is highly sensitive and specific and can detect a wide range of antigens in many animal species. Therefore, IHC is widely used in many research and clinical laboratories.
Creative Biolabs develops and optimizes IHC protocols, summarizes general IHC procedures for laboratory personnel, and provides troubleshooting and tips for each step of the process. In addition to basic guidelines for protocols, we also offer related products and services. In order for you to get more accurate and faster results, you can read the IHC protocol below before starting your experiment.
Solutions and Reagents
| Stages | Solutions and Reagents |
| Slide Preparation | Tissue sections, wash buffer, fixative solution, antigen retrieval solution |
| Immunostaining | Blocking buffer, primary antibody, labeled secondary antibody, dilution buffer, wash buffer, incubation buffer, chromogen |
| Counterstaining and Mounting | Counterstains, wash buffer, mounting solution |
Immunohistochemistry Procedure
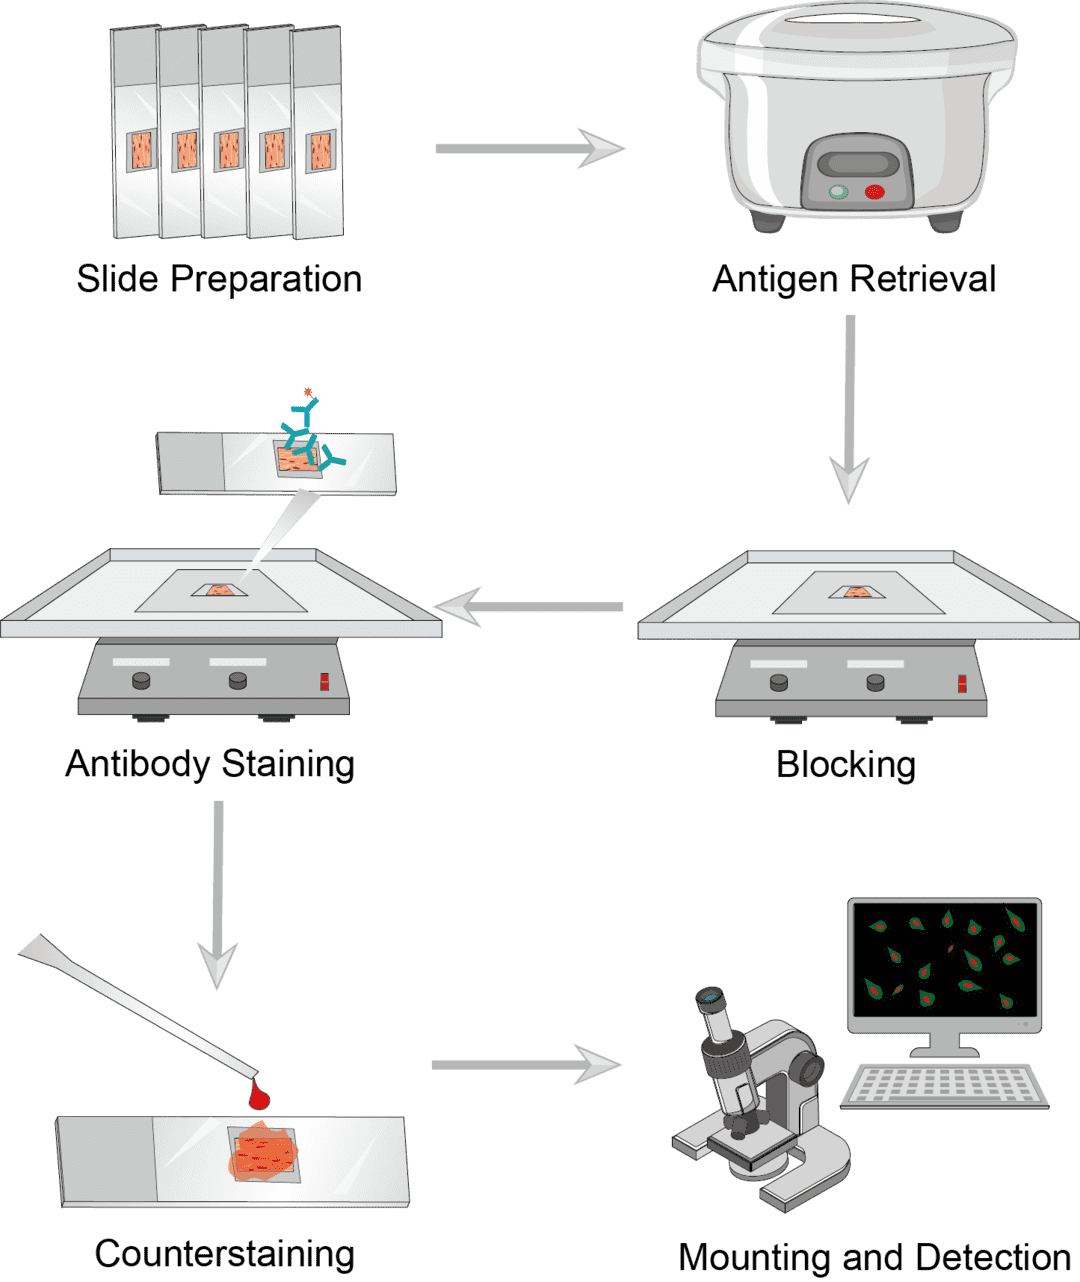
1. Slide Preparation
Common tissue sections include paraffin-embedded (FFPE) sections and frozen sections. The first step is to slice on ice with a microtome, typically 4-7 μm thick, depending on the type of tissue. FFPE tissue sections need to be dried in preparation for dewaxing. Frozen sections can bedried or not, with optional steps depending on the type of section.
2. Antigen Retrieval
Antibody-binding epitopes may be masked in fixation. For this reason, antigen repair is sometimes required to reveal epitopes. Heat-induced epitope repair (HIER) is the most widely used antigen repair method, and a variety of heating methods are available to optimize antigenicity, such as microwaving and boiling.
3. Blocking
The blocking step can reduce unwanted background staining. Select the ideal blocking reagent and incubate the sample with the blocking buffer. Incubation time and temperature are set on a case-by-case basis. When finished, wash the slide and remove the blocking buffer.
4. Antibody Staining
IHC can be stained by indirect or direct labeling. For direct labeling, dilute the primary antibody appropriately and transfer the slide to the incubation buffer containing the primary antibody for incubation. Then wash the slides. For indirect assays, transfer the sections to an incubation buffer containing the secondary antibody and continue incubation. Wash the slide after completion to remove excess solution. Add the appropriate dilution of chromogenic agent to the slides and incubate away from light.
5. Counterstaining and Mounting
Counterstaining provides contrast with antibody staining to better distinguish the target signal. Select the ideal counterstains, incubate the sections, and rinse them upon completion. After all staining, use the appropriate sealing solution to mount coverslips and seal the samples. Mounted slides can be viewed under a microscope to observe the color of antibody staining in tissue sections.
Troubleshooting
There are multiple methods and combinations of IHC, so when poor staining results occur, there can be many reasons. We describe below possible scenarios and solutions that may be useful for troubleshooting. And hope you find them helpful in understanding immunohistochemistry procedures.
No or inadequate staining
- Antigen causes. If the test slide is inadequately stained or unstained, while the positive control slide is adequately stained, the antigen may be the problem. The antigen is not present in the test tissue or is present but at a level below the limit of detection. Consider using an amplification procedure or increasing the primary antibody concentration, incubation time, or temperature. If antigen coverage is caused by over-fixation or under-fixation of tissue sections, a modified antigen retrieval protocol is required.
- Antibody causes. If the positive control is weak or unstained and the test slide is also weak or unstained, the antibody may be the cause. Check the antibody, including conditions such as dilution concentration, incubation time, and temperature. Pay attention to check if the secondary antibody and primary antibody are compatible because the test requires the use of a secondary antibody that will interact with the primary antibody.
- Reagent causes. It is necessary to check the relevant reagents such as buffers and chromogenic agents, and expiration dates, storage parameters, pH, and order of use are all included.
High background
- Section causes. Consider first if the tissue section is too thick and thinner sections can be prepared. Then check if sections are adequately fixed or if necrosis and autolysis are present. If any of these conditions are present, avoid sampling necrotic areas and ensure that the tissue is properly fixed. As well, inappropriate kinds of or the excess use of section adhesives can affect the background. Throughout the process, check and ensure that tissue sections are not dry.
- Antigen retrieval causes. You may have used an inappropriate antigen retrieval method. Please re-evaluate the antigen retrieval conditions and optimize the antigenicity of your sample.
- Blocking causes. Possible reasons for this are inadequate blocking of endogenous enzyme activity, biotin, or protein during the blocking phase. You can increase the concentration of the blocking agent or use a different blocking agent. In addition, you need to be aware that the blocking buffer should be made from a blocking serum of the same species.
- Primary antibody causes. Improper antibody concentration causes high background. You can re-titrate the primary antibody and select the appropriate concentration. Check the primary antibody incubation time, too long time can also cause this problem. You can shorten the incubation time. Clean sections and no antibody solution remaining should be ensured as well.
- Secondary antibody causes. As with the primary antibody, check the secondary antibody and label concentration and incubation time. It is important to note that the secondary antibody chosen needs to be unbound to tissue immunoglobulins. Clean sections and no excess stain remaining should be ensured as well.
- Chromogen causes. If the chromogen concentration is too high and the reaction time is too long, you need to reduce the chromogen concentration and shorten the incubation time. It is also possible that the counterstain is masking the IHC reaction and we suggest you replace a different counterstain. As well as ensure that the sections are cleaned and no excess stain remains.
IHC is widely used in basic research. It can help you understand the distribution and localization of differentially expressed proteins in different parts of biological tissues. Not only is it a useful technique, but it is also very simple to perform. We hope that our products, services, and technical support will be useful to you in the conduct of immunohistochemistry.
You can contact us and learn more information, as well as tips and tricks, for immunohistochemistry experiments.
Products with Tested Data
At Creative Biolabs, we are dedicated to providing high-quality antibodies for various research applications. Each product in our extensive range has been rigorously tested to ensure superior reliability and efficacy. To showcase the performance of our antibodies, we have conducted numerous experiments using Immunohistochemistry (IHC). Below, you will find a table listing a selection of our antibody products along with images from these experiments, demonstrating their proven reliability.
| Product Name | Catalog Number | Target | Image | Description |
|---|---|---|---|---|
| Mouse Anti-CXCL8 Recombinant Antibody (clone 14E1) | MOB-0055F | CXCL8 |

|
Immunohistochemical analysis of paraffin-embedded human lung cancer tissue using IL-8 Mouse mAb diluted 1:200. |
| Rabbit Anti-CCR2 Recombinant Antibody (clone 6A1) | ZG-0123U | CCR2 |

|
IHC image of ZG-0123U diluted at 1:100 and staining in paraffin-embedded human tonsil tissue performed on a Leica BondTM system. After dewaxing and hydration, antigen retrieval was mediated by high pressure in a citrate buffer (pH 6.0). Section was blocked with 10% normal goat serum 30min at RT. Then primary antibody (1% BSA) was incubated at 4°C overnight. The primary is detected by a Goat anti-rabbit IgG polymer labeled by HRP and visualized using 0.05% DAB. |
| Mouse Anti-CBX3 Recombinant Antibody (clone 3B9) | MOB-0039F | CBX3 |

|
The HP-1γ Mouse mAb diluted 1:200 was used for immunohistochemical analysis of paraffin-embedded human placenta. |
| Mouse Anti-IGF-2 Recombinant Antibody (MOB-0053F) | MOB-0053F | IGF-2 |

|
Immunohistochemical analysis of paraffin-embedded pancreatic cancer. 1. The antibody is diluted 1:200 (overnight at 4°C). 2. Use pH8.0 TRIS-EDTA for antigen retrieval. 3. Dilute the secondary antibody at 1:200 (room temperature, 30min). |
| Mouse Anti-JAK2 Recombinant Antibody (clone 3F10) | MOB-0064F | JAK2 |

|
A 1:200 dilution of JAK2 Mouse mAb was used for immunohistochemical analysis of paraffin-embedded human lung cancer tissues. |
| Mouse Anti-CBX5 Recombinant Antibody (clone 5E3) | MOB-0037F | CBX5 |

|
The HP-1 α Mouse mAb diluted 1:200 was used for immunohistochemical analysis of paraffin-embedded human colon cancer tissue. |
| Mouse Anti-HSPD1 Recombinant Antibody (MOB-0044F) | MOB-0044F | HSPD1 |

|
Immunohistochemical analysis of paraffin-embedded hepatocellular carcinoma. 1. The antibody is diluted 1:200 (overnight at 4°C). 2. Citric acid, pH 6.0 is used for antigen retrieval. 3. Dilute the secondary antibody at 1:200 (room temperature, 30min). |
| Mouse Anti-Histone H3 (K9) Recombinant Antibody (clone 2E7) | ZG-0008J | Histone H3 (K9) |

|
Immunohistochemical analysis of paraffin-embedded Human Breast Carcinoma Tissue using Acetyl Histone H3 K9 Mouse mAb diluted at 1:200. |
| Mouse Anti-Actin, Muscle Specific Recombinant Antibody (ZG-0011J) | ZG-0011J | Actin, Muscle Specific |

|
Immunohistochemical analysis of paraffin-embedded Cardiac muscle. 1. Antibody was diluted at 1:200 (4°C overnight). 2, Citric acid , pH6.0 was used for antigen retrieval. 3, Secondary Antibody was diluted at 1:200 (room temperature, 30min). |
| Mouse Anti-Actin, sarcomeric muscle Recombinant Antibody (ZG-0014J) | ZG-0014J | Actin, sarcomeric muscle |

|
Immunohistochemical analysis of paraffin-embedded human Myocardium. 1.Actin, sarcomeric muscle Antibody was diluted at 1:200 (4°C overnight). 2, Citrate buffer of pH6.0 was used for antigen retrieval |
| Rabbit Anti-SOX9 Recombinant Antibody (clone 5H12) | ZG-0122U | SOX9 |

|
IHC image of ZG-0122U diluted at 1:100 and staining in paraffin-embedded human colon cancer performed on a Leica BondTM system. After dewaxing and hydration, antigen retrieval was mediated by high pressure in a citrate buffer (pH 6.0). Section was blocked with 10% normal goat serum 30min at RT. Then primary antibody (1% BSA) was incubated at 4°C overnight. The primary is detected by a Goat anti-rabbit IgG polymer labeled by HRP and visualized using 0.05% DAB. |
| Mouse Anti-MFGE8 Recombinant Antibody (clone 2B2D10) | ZG-0144U | MFGE8 |

|
Immunohistochemical of paraffin-embedded human Colon cancer tissues using ZG-0144U at dilution of 1:200. |
| Mouse Anti-FTL Recombinant Antibody (clone 1A2C5) | ZG-0150U | FTL |

|
Immunohistochemical of paraffin-embedded human liver tissue using ZG-0150U at dilution of 1:200. |
| Mouse Anti-ABCB5 Recombinant Antibody (clone 11A2) | ZG-0001J | ABCB5 |

|
Immunohistochemical analysis of paraffin-embedded Human-breast-cancer tissue. 1.ABCB5 Monoclonal Antibody was diluted at 1:200 (4°C, overnight). 2, Sodium citrate pH 6.0 was used for Antibody retrieval(>98°C, 20min). 3, Secondary Antibody was diluted at 1:200 (room temperature, 30min). Negative control was used by secondary Antibody only. |
| Mouse Anti-SMARCB1 Recombinant Antibody (MOB-0057F) | MOB-0057F | SMARCB1 |

|
Immunohistochemical analysis of paraffin-embedded astrocytoma. 1. The antibody is diluted 1:200 (overnight at 4°C). 2. Use pH 6.0 citrate buffer for antigen retrieval. 3. Dilute the secondary antibody at 1:200 (room temperature, 30min). |
| Mouse Anti-JAK1 Recombinant Antibody (clone 7G6) | MOB-0063F | JAK1 |

|
The JAK1 Mouse mAb diluted 1:200 was used for immunohistochemical analysis of paraffin-embedded human lung cancer tissues. |
| Mouse Anti-AFP Recombinant Antibody (clone 17C5) | ZG-0018J | AFP |

|
Immunohistochemical analysis of paraffin-embedded Human-breast-cancer tissue. 1.AFP alpha 1 Fetoprotein Monoclonal Antibody was diluted at 1:200 (4°C, overnight). 2, Sodium citrate pH 6.0 was used for Antibody retrieval(>98°C, 20min). 3, Secondary Antibody was diluted at 1:200 (room temperature, 30min). Negative control was used by secondary Antibody only. |
| Mouse Anti-IDE Recombinant Antibody (clone 3H4) | MOB-0051F | IDE |

|
Immunohistochemical analysis of paraffin-embedded human liver cancer tissue. 1. IDE Monoclonal Antibody (3H4) 1:200 dilution (4°C, overnight). 2. Sodium citrate pH 6.0 is used for antibody repair (> 98°C, 20 minutes). 3. Dilute the secondary antibody at 1:200 (room temperature, 30min). The negative control is only used by the secondary antibody. |
| Mouse Anti-MKI67 Recombinant Antibody (MOB-0068F) | MOB-0068F | MKI67 |

|
Immunohistochemical analysis of paraffin-embedded Hodgkin's lymphoma. 1. The antibody is diluted 1:200 (overnight at 4°C). 2. Use TRIS-EDTA with pH 8.0 as antigen. |
| Mouse Anti-AKT1 Recombinant Antibody (clone 10D6) | ZG-0019J | AKT1 |

|
Immunohistochemical analysis of paraffin-embedded Colon. 1. Antibody was diluted at 1:200 (4°C overnight). 2, Citrate buffer of pH6.0 was used for antigen retrieval. 3, Secondary Antibody was diluted at 1:200 (room temperature, 30min) |
| Mouse Anti-Actin pan Recombinant Antibody (ZG-0010J) | ZG-0010J | Actin pan |

|
Immunohistochemical analysis of paraffin-embedded Human Lung Carcinoma Tissue using Akt Mouse mAb diluted at 1:200. |
| Rabbit Anti-SKP2 Recombinant Antibody (clone 6D4) | ZG-0126U | SKP2 |

|
IHC image of ZG-0126U diluted at 1:100 and staining in paraffin-embedded human placenta tissue performed on a Leica BondTM system. After dewaxing and hydration, antigen retrieval was mediated by high pressure in a citrate buffer (pH 6.0). Section was blocked with 10% normal goat serum 30min at RT. Then primary antibody (1% BSA) was incubated at 4°C overnight. The primary is detected by a Goat anti-rabbit IgG polymer labeled by HRP and visualized using 0.05% DAB. |
| Rabbit Anti-MET Recombinant Antibody (clone 6E5) | ZG-0127U | MET |

|
IHC image of ZG-0127U diluted at 1:100 and staining in paraffin-embedded human breast cancer performed on a Leica BondTM system. After dewaxing and hydration, antigen retrieval was mediated by high pressure in a citrate buffer (pH 6.0). Section was blocked with 10% normal goat serum 30min at RT. Then primary antibody (1% BSA) was incubated at 4°C overnight. The primary is detected by a Goat anti-rabbit IgG polymer labeled by HRP and visualized using 0.05% DAB. |
| Mouse Anti-INS Recombinant Antibody (MOB-0058F) | MOB-0058F | INS |

|
Immunohistochemical analysis of paraffin-embedded pancreas. 1. The antibody is diluted 1:200 (overnight at 4°C). 2. Citric acid, pH 6.0 is used for antigen retrieval. 3. Dilute the secondary antibody at 1:200 (room temperature, 30min). |
| Mouse Anti-IκB β Recombinant Antibody (clone 8D11) | MOB-0062F | IκB β |

|
IκB β (mouse mAb diluted 1:200) was used for immunohistochemical analysis of paraffin-embedded human lung cancer. |
| Mouse Anti-ANXA1 Recombinant Antibody (ZG-0034J) | ZG-0034J | ANXA1 |

|
Immunohistochemical analysis of paraffin-embedded Tonsil. 1. Antibody was diluted at 1:200 (4°C overnight). 2, TRIS-EDTA of pH8.0 was used for antigen retrieval. 3, Secondary Antibody was diluted at 1:200 (room temperature, 30min) |
| Mouse Anti-AQP4 Recombinant Antibody (clone 4H1) | ZG-0035J | AQP4 |

|
Immunohistochemical analysis of paraffin-embedded Human-liver-cancer tissue. 1.Aquaporin 4 Monoclonal Antibody was diluted at 1:200 (4°C, overnight). 2, Sodium citrate pH 6.0 was used for Antibody retrieval(>98°C, 20min). 3, Secondary Antibody was diluted at 1:200 (room temperature, 30min). Negative control was used by secondary Antibody only. |
| Mouse Anti-Actin, smooth muscle (SMA) Recombinant Antibody (ZG-0015J) | ZG-0015J | Actin, smooth muscle (SMA) |

|
Immunohistochemical analysis of paraffin-embedded Cardiac muscle. 1. Antibody was diluted at 1:200 (4°C overnight). 2, TRIS-EDTA of pH8.0 was used for antigen retrieval. 3, Secondary Antibody was diluted at 1:200 (room temperature, 30min) |
| Mouse Anti-ARG1 Recombinant Antibody (ZG-0036J) | ZG-0036J | ARG1 |

|
Immunohistochemical analysis of paraffin-embedded human Hepatocellular carcinoma. 1, Arginase-1 Antibody was diluted at 1:200 (4°C overnight). 2, EDTA pH 8.0 was used for antigen retrieval |
| Mouse Anti-AMACR Recombinant Antibody (clone 4A12) | HPAB-0570-YJ | AMACR |

|
Immunohistochemical analysis of paraffin-embedded Rat-kidney tissue. 1.AMACR Monoclonal Antibody was diluted at 1:200 (4°C, overnight). 2, Sodium citrate pH 6.0 was used for Antibody retrieval(>98°C, 20min). 3, Secondary Antibody was diluted at 1:200 (room temperature, 30min). Negative control was used by secondary Antibody only. |
| Mouse Anti-Histidine-rich protein PFHRP-II Recombinant Antibody (clone 2A1B1) | ZG-0168U | Histidine-rich protein PFHRP-II |

|
Immunohistochemical of paraffin-embedded human cervical cancer using ZG-0168U at dilution of 1:200. |
| Mouse Anti-AMBP Recombinant Antibody (clone 1C11F7) | ZG-0174U | AMBP |

|
Immunohistochemical of paraffin-embedded human liver tissue using ZG-0174U at dilution of 1:200. |
| Mouse Anti-CD81 Recombinant Antibody (clone 2E11E5) | ZG-0193U | CD81 |

|
Immunohistochemical of paraffin-embedded Human tonsil tissue using ZG-0193U at dilution of 1:200. |
| Mouse Anti-Mammaglobin Recombinant Antibody (MOB-0094F) | MOB-0094F | Mammaglobin |

|
Immunohistochemical analysis of paraffin-embedded breast cancer. 1. The antibody is diluted 1:200 (overnight at 4°C). 2. Use pH8.0 TRIS-EDTA for antigen retrieval. 3. Dilute the secondary antibody at 1:200 (room temperature, 30min). |
| Mouse Anti-TPSAB1 Recombinant Antibody (MOB-0098F) | MOB-0098F | TPSAB1 |

|
Immunohistochemical analysis of paraffin-embedded uterus. 1. The antibody is diluted 1:200 (overnight at 4°C). 2. Use pH 6.0 citrate buffer for antigen retrieval. 3. Dilute the secondary antibody at 1:200 (room temperature, 30min). |
| Rabbit Anti-DMD Recombinant Antibody (clone 4B10) | ZG-0637J | DMD |

|
IHC image of this product diluted at 1:100 and staining in paraffin-embedded human heart tissue performed on a Leica BondTM system. After dewaxing and hydration, antigen retrieval was mediated by high pressure in a citrate buffer (pH 6.0). Section was blocked with 10% normal goat serum 30min at RT. Then primary antibody (1% BSA) was incubated at 4°C overnight. The primary is detected by a Goat anti-rabbit IgG polymer labeled by HRP and visualized using 0.05% DAB. |
| Mouse Anti-IFNG Recombinant Antibody (clone 1A1B7) | ZG-0146U | IFNG |

|
Immunohistochemical of paraffin-embedded human cervical using ZG-0146U at dilution of 1:200. |
| Mouse Anti-RB1 Recombinant Antibody (ZG-060R) | ZG-060R | RB1 |

|
Immunohistochemistry staining of paraffin-embedded human normal esophagus (A) and stomach (B) tissue, showing nucleus localization withDAB staining using Rb monoclonal antibody. |
| Mouse Anti-REG1A Recombinant Antibody (ZG-064R) | ZG-064R | REG1A |

|
Immunohistochemistry analysis of paraffin-embedded human Pancreas tissues with AEC staining using Reg Iα monoclonal antibody. |
| Rabbit Anti-RARA Recombinant Antibody (clone 4A10) | ZG-0542U | RARA |

|
IHC image of ZG-0542U diluted at 1:155 and staining in paraffin-embedded human breast cancer performed on a Leica BondTM system. After dewaxing and hydration, antigen retrieval was mediated by high pressure in a citrate buffer (pH 6.0). Section was blocked with 10% normal goat serum 30min at RT. Then primary antibody (1% BSA) was incubated at 4°C overnight. The primary is detected by a biotinylated secondary antibody and visualized using an HRP conjugated SP system. |
| Rabbit Anti-RBP4 Recombinant Antibody (clone 9G7) | ZG-0545U | RBP4 |

|
IHC image of ZG-0545U diluted at 1:100 and staining in paraffin-embedded human liver tissue performed on a Leica BondTM system. After dewaxing and hydration, antigen retrieval was mediated by high pressure in a citrate buffer (pH 6.0). Section was blocked with 10% normal goat serum 30min at RT. Then primary antibody (1% BSA) was incubated at 4°C overnight. The primary is detected by a Goat anti-rabbit IgG polymer labeled by HRP and visualized using 0.05% DAB. |
| Rabbit Anti-DPP4 Recombinant Antibody (clone 6G7) | ZG-0640J | DPP4 |

|
IHC image of this product diluted at 1:100 and staining in paraffin-embedded human prostate cancer performed on a Leica BondTM system. After dewaxing and hydration, antigen retrieval was mediated by high pressure in a citrate buffer (pH 6.0). Section was blocked with 10% normal goat serum 30min at RT. Then primary antibody (1% BSA) was incubated at 4°C overnight. The primary is detected by a Goat anti-rabbit IgG polymer labeled by HRP and visualized using 0.05% DAB. |
| Rabbit Anti-ACVR2B Recombinant Antibody (clone 7B10) | ZG-0132U | ACVR2B |

|
IHC image of ZG-0132U diluted at 1:100 and staining in paraffin-embedded human placenta tissue performed on a Leica BondTM system. After dewaxing and hydration, antigen retrieval was mediated by high pressure in a citrate buffer (pH 6.0). Section was blocked with 10% normal goat serum 30min at RT. Then primary antibody (1% BSA) was incubated at 4°C overnight. The primary is detected by a Goat anti-rabbit IgG polymer labeled by HRP and visualized using 0.05% DAB. |
| Mouse Anti-MYCBP Recombinant Antibody (clone 1D5D5) | ZG-0189U | MYCBP |

|
Immunohistochemical of paraffin-embedded Human testis tissue using ZG-0189U at dilution of 1:200. |
| Mouse Anti-PRL Recombinant Antibody (clone 4A2B3) | ZG-0159U | PRL |

|
Immunohistochemical of paraffin-embedded human breast cancer using ZG-0159U at dilution of 1:200. |
| Mouse Anti-AHSG Recombinant Antibody (clone 4A1B5) | ZG-0162U | AHSG |

|
Immunohistochemical of paraffin-embedded human liver cancer using ZG-0162U at dilution of 1:200. |
| Mouse Anti-CST3 Recombinant Antibody (clone 3A1B7) | ZG-0170U | CST3 |

|
Immunohistochemical of paraffin-embedded human prostate tissue using ZG-0170U at dilution of 1:200. |
| Mouse Anti-IL6 Recombinant Antibody (clone 6D4H9) | ZG-0175U | IL6 |

|
Immunohistochemical of paraffin-embedded human prostate tissue using ZG-0175U at dilution of 1:200. |
| Mouse Anti-INHA Recombinant Antibody (ZG-0508J) | ZG-0508J | INHA |

|
Immunohistochemistry analysis of paraffin-embedded human lymphoid (A), ovary tumor (B) and testicle tumor (C) tissues with DAB staining using Inhibin α Monoclonal Antibody. |
| Mouse Anti-AR Recombinant Antibody (ZG-0032J) | ZG-0032J | AR |

|
Immunohistochemical analysis of paraffin-embedded Prostatic carcinoma. 1. Antibody was diluted at 1:200 (4°C overnight). 2, TRIS-EDTA of pH8.0 was used for antigen retrieval. 3, Secondary Antibody was diluted at 1:200 (room temperature, 30min). |
For research use only. Not intended for any clinical use.
Send Inquiry
This site is protected by reCAPTCHA and the Google Privacy Policy and Terms of Service apply.