

Immunoassay Protocol & Troubleshooting
Immunoassay is a method for determining the amount of a substance to be measured in a sample using the principles of immunology. There are many different methods and forms of immunoassays. These methods are often used for clinical diagnosis, drug discovery, drug monitoring and food testing.
Creative Biolabs is dedicated to optimizing immunoassay protocols to obtain the best possible data results. We provide general guidelines to help you to develop optimize and validate immunoassays. You can read our entire protocol before performing the assay. As well as other relevant protocols and troubleshooting tips for different types of immunoassays, please visit our other protocols page.
Solutions and Reagents
| Stages | Solutions and Reagents |
| Sample Preparation | Standards, washing buffer, dilution buffer |
| Antibody Incubation | Dilution buffer, capture antibody, detection antibody, marker, washing buffer, incubation buffer |
Immunoassay Procedure
Immunoassays rely on the ability of antibodies to recognize and bind specific macromolecules in a mixture. Another key feature is the method of generating a measurable signal in response to the binding. Thus, immunoassays allow detection by different means. Here, we describe the basic steps of running an immunoassay.
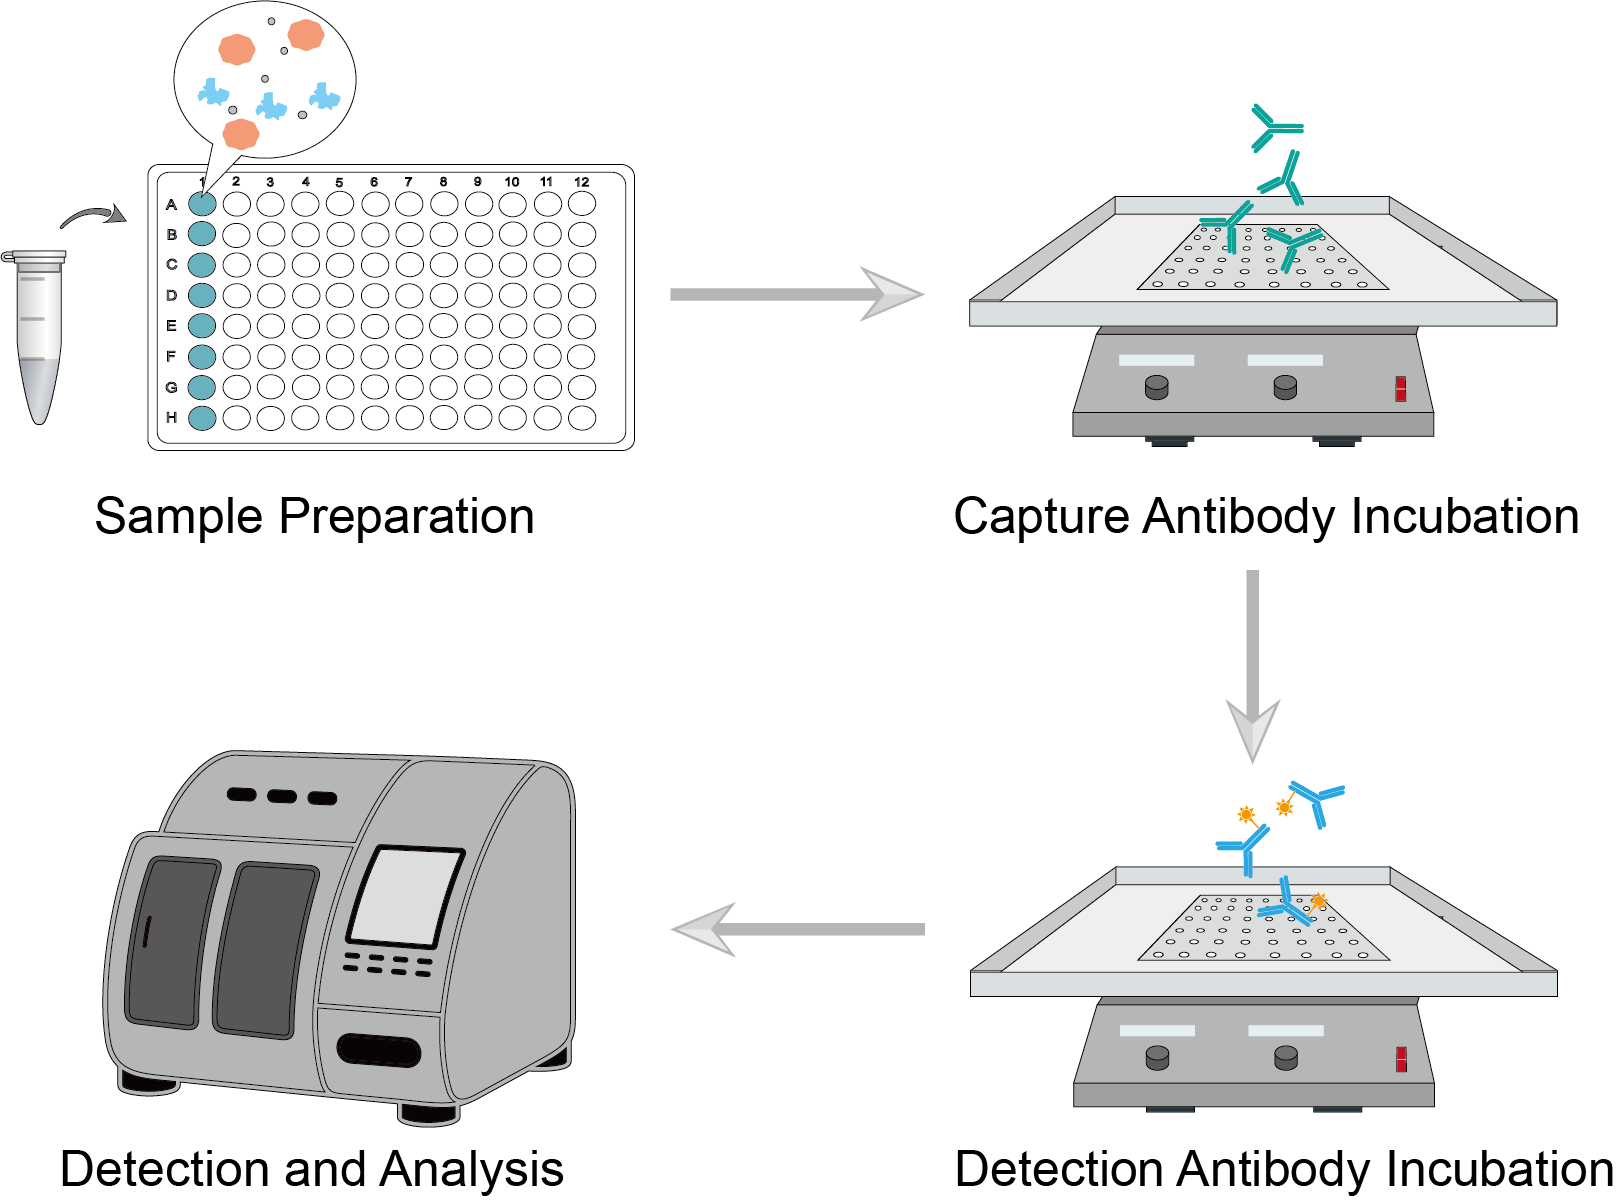 Figure 1: Immunoassay Procedure.
1. Sample Preparation
Collect biological samples and perform certain pre-processing steps depending on your target analytes. Prepare standards and samples and add them to the plate.
2. Capture Antibody Incubation
Add an equal amount of capture antibody to each sample well on the plate. Incubate at the specified time and temperature. Upon completion, perform multiple washes to ensure that unbound reagents are washed away.
3. Detection Antibody Incubation
Add an equal amount of the detection antibody to each sample well on the plate. Incubate at the specified time and temperature. Incubate again by adding the appropriate marker of your choice. Ligate or splice the antibody for subsequent signal detection. Upon completion, perform multiple washes to ensure that unbound reagents are washed away.
4. Detection and Analysis
Wash and re-add to the appropriate buffer. Load the sample and acquire the generated signal on the instrument. Based on the obtained data, you can fit a standard curve and perform data analysis.
Troubleshooting
High absorbance values
- Sample causes. The concentration of the sample or positive control is too high and may be outside the range of the assay sensitivity. Re-evaluate the assay you are using, or reduce the concentration of the sample and control by dilution before adding to the plate.
Low absorbance values
- Sample causes. It is possible that the target protein is not expressed in the sample used or is not immunoreactive. We recommend that you check the expression profile of the target protein to ensure that it is expressed in your samples. If the target protein expression level is low, increase the amount of sample used or you may need to change to a more sensitive assay.
- Antibody causes. Insufficient antibodies cause low signals. You can check to see if the recommended amount of antibody is being used. You can optimize performance by increasing the antibody concentration.
- Incubation causes. It is possible that the incubation time is short or the temperature is not appropriate. Please ensure that you incubate the antibody for the recommended time. Ensure that incubation is performed at the correct temperature.
- Regent causes. Reagents and solutions are not fresh or incorrectly combined. Prepare the various solutions according to the instructions before use. You need to make sure that the stock solutions are not expired and have been stored correctly. As well as making sure that the reagents are prepared at the correct concentration and pH.
Inconsistent absorbance
- Incubation causes. Placement or stacking of plates during incubation can lead to uneven distribution of incubation temperature. The above issues should be considered to avoid unevenness during incubation.
- Antibody causes. Antibody dilutions are not adequately mixed. To ensure consistent concentrations in all wells, be sure to mix all reagents and samples thoroughly and equilibrate them at room temperature before pipetting onto the plate.
- Pipette causes. Pipetting inconsistencies cause this. You need to make sure that the pipette is working properly and is calibrated. Ensure that the pipette tips are pushed far enough to form a good seal. Be especially careful when diluting plates and watch to ensure that the pipette tips are all absorbing and releasing the correct amount of liquid. This will greatly affect the consistency of results between replicates.
- Washing causes. Some wells may not be washed as well as others, leaving different amounts of unbound antibodies and thus producing inconsistent results. We recommend that you perform an adequate washing step to ensure that each well is washed thoroughly.
High background
- Incubation causes. Incubation conditions are not appropriate, including problems such as too high temperatures and too long periods of time. Ensure proper incubation at the correct temperature. Do not expose to vents that may affect incubation temperature. As well as avoid incubating substrates in direct sunlight.
- Stop solution causes. The reaction is not stopped in time, or not stopped at all. If the substrate reaction is not stopped, the color will continue to develop. We recommend adding a termination solution, which will increase the intensity of the color development reaction and stabilize the final color development.
- Plates left too long causes. You may set aside the plate too long before reading it on the plate reader. In chemiluminescence analysis, the signal drops off rapidly after a certain amount of time. You are better off performing the assay within the recommended optimal reading time.
- Contamination causes. Contaminants in laboratory glassware cause high background. Ensure that reagents are fresh and prepared in clean glassware free of any contaminants or residual solvents.
You can contact us at any time. Our team has the expertise and skills to provide first-class immunoassay services to meet your analytical needs.
For research use only. Not intended for any clinical use.
Send Inquiry
This site is protected by reCAPTCHA and the Google Privacy Policy and Terms of Service apply.