

Functional Assay Protocol & Troubleshooting
Cellular function is what cells do to sustain life, proliferate or protect themselves. Understanding cellular function is critical to cellular research. Functional assays enable researchers to monitor key cellular processes, enable cell tracking, and assess cytotoxicity. Importantly, functional assays can contribute to our understanding of specific diseases.
Many functional assays rely on certain key reagents, such as antibodies. Creative Biolabs offers a wide range of cellular functional assay services and reagent products. We describe flow cytometry-based functional assay protocols as a rapid, accurate and customizable assay that can be used in basic or preclinical research settings.
Solutions and Reagents
| Stages | Solutions and Reagents |
| Sample Preparation | Phosphate buffer (PBS), staining buffer, blocking buffer |
| Functional Assay | Primary and secondary antibodies, antibody dilution buffer, fixative, permeabilizer, washing buffer |
Functional Assay Procedure
Cell proliferation, endocytosis, cytokinesis and phagocytosis, calcium flux, oxidative metabolism, and other such types of functional analyses can be obtained using a reliable and powerful flow cytometry-based research platform.
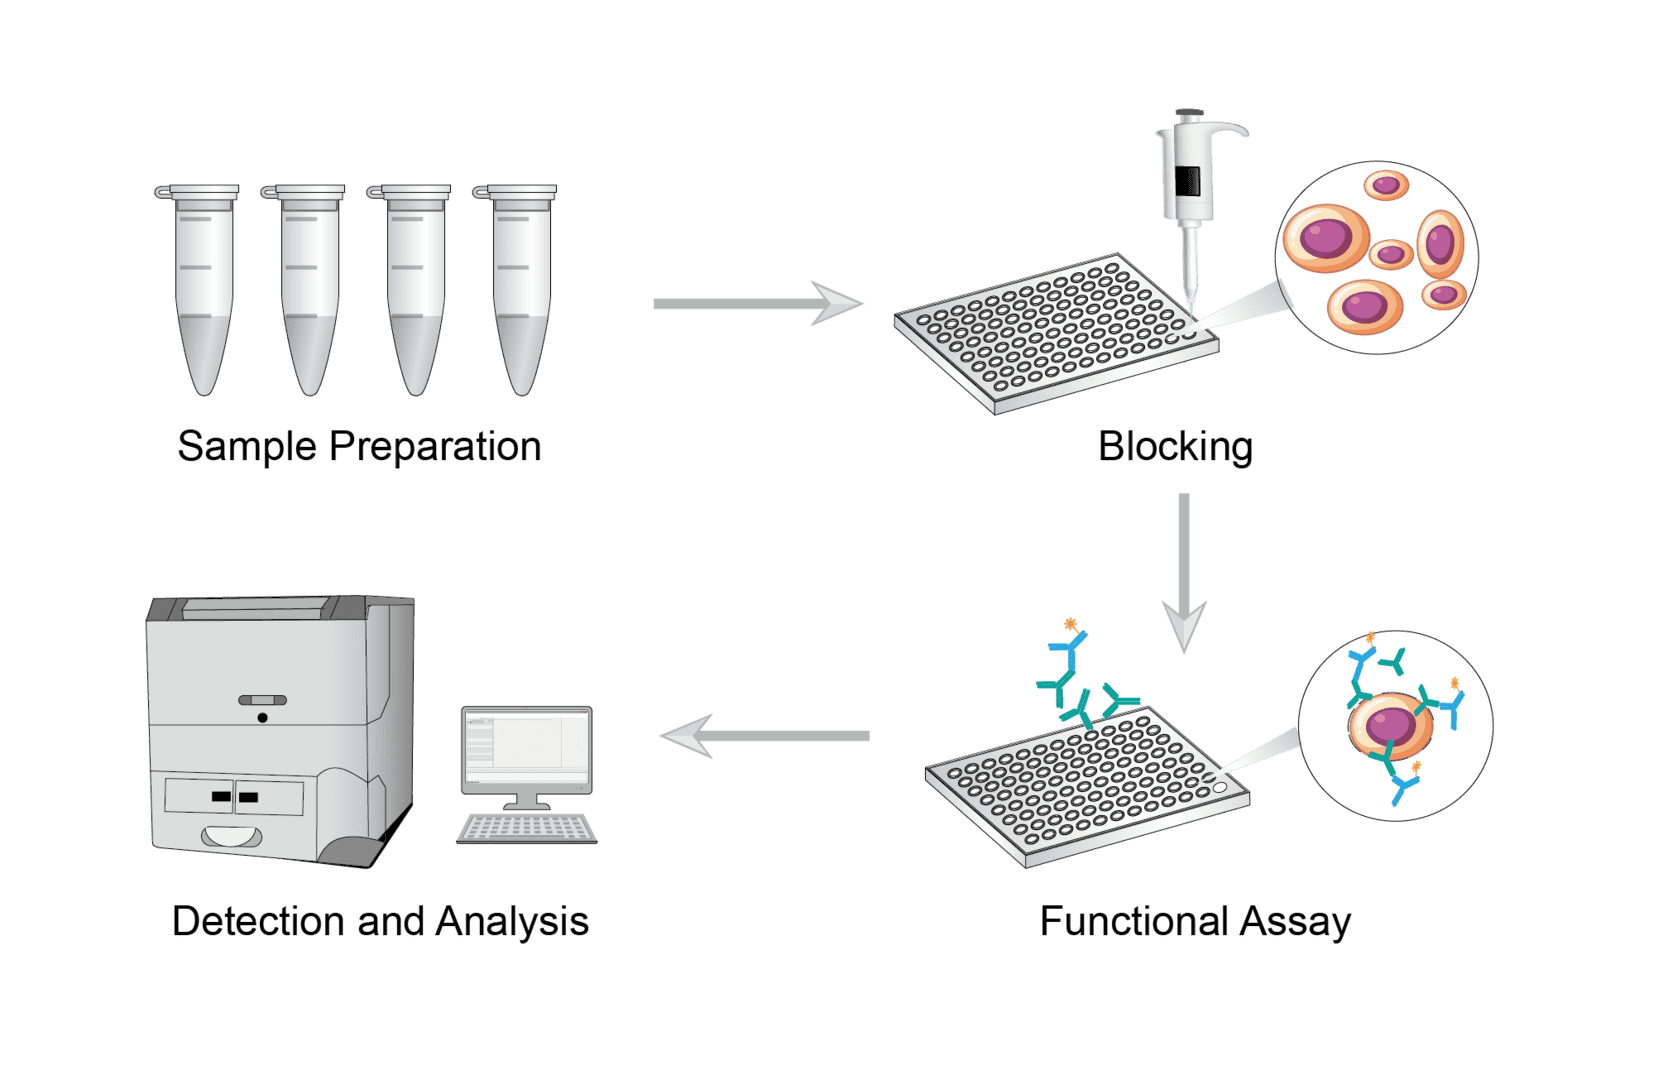
1. Sample Preparation
Functional assay requires homogeneous single cell suspensions. Perform appropriate manipulations to obtain cell suspensions for adherent cells, non-adherent cells, tissue samples, etc. Mix the cell suspensions gently to ensure uniform mixing. Use a cell counter to obtain cell counts. Resuspend cells with staining buffer to the appropriate concentration.
2. Blocking
Blocking prevents non-specific binding of the antibody to the cell. Blocking agents can be selected based on the sample. Add a small amount of blocking agent to the cells for incubation. No washing step is required to ensure that blocking can be maintained throughout the process.
3. Functional Assay
Select specific reagents based on the key cellular processes you need to elucidate. Assays available include, but are not limited to, apoptosis, cell proliferation, cell cycle and viability, oxidative stress, internalization processes such as phagocytosis and endocytosis, and indicators of ion homeostasis. You can explore our extensive portfolio of high-quality primary and secondary antibodies.
4. Detection and Analysis
Run samples on a flow cytometer and collect assay data. Analyze the data using flow cytometry data analysis software.
Troubleshooting
Performing various functional assays of cells on flow cytometry, despite the simple steps, you may encounter some problems. Therefore, we list some common problems and solutions in flow cytometry assays for your reference.
Weak or no fluorescence signal
- Sample causes. First use freshly isolated cells whenever possible, rather than frozen samples. If using cryopreserved cells, check that the target antigen will not be affected by the freezing/thawing procedure. Next, check that the target protein is present in the cells and in sufficiently high amounts. For low expression antigens, use the brightest fluorescent dye or a two-step staining method to increase sensitivity. Finally, remember to perform all protocol steps at 4°C and use cold reagents.
- Fixation/permeabilization causes. If no signal is detected, it may be that your target antigen is inaccessible. Check that the fixation and permeabilization methods are correctly used for the target of interest. In addition to careful selection of the most appropriate fixative and permeabilization reagents, different procedures need to be used depending on the protein being detected.
- Antibody causes. If your signal is weak, your test antibody may be too dilute. We recommend increasing the amount or concentration of antibody. Or titrate the antibody before use to find the optimal amount for your particular experiment. You can also optimize antibody incubation time and temperature and consider using additional steps to amplify the signal. It is important to use secondary antibodies generated against the species from which the primary antibody was generated.
- Fluorescent dye causes. When selecting a fluorochrome, it is important to match the target used. It is important to control for any potential changes in fluorescence properties during the experiment, such as light, storage time, etc. Make sure that the fluorescence of the fluorescent dye is not fading at the time of the assay.
- Reagent causes. Take care to ensure that all reagents and solutions are of good quality and stored according to the manufacturer's instructions.
Excess fluorescent signal
- Antibody causes. High antibody concentrations can produce high non-specific binding or very high fluorescence intensity. You can reduce the amount of antibody added to each sample. It is better to titrate the antibody prior to use to find the optimal amount for a particular experiment.
- Fluorescent dye causes. Match the appropriate fluorescent dye to the antigen density.
- Blocking causes. Insufficient blocking causes excess signal due to non-specific binding. We recommend adding blocking agents and diluting antibodies in the blocking solution and increasing the blocking time.
- Washing causes. It may occur that unbound antibodies are trapped in the cells. Wash the cells well after each antibody incubation step.
High background
- Cell causes. One possibility is due to the presence of dead cells. A reactive dye can be used to exclude the dead cells. The other is due to high autofluorescence. Some cell types may naturally exhibit higher levels of autofluorescence. You can use fluorescent dyes that emit in the red-shift channel or very bright fluorescent dyes to solve the problem.
- Non-specific binding causes. The fact that the antibody targets a non-specific cell causes a high background. Block non-specific receptors on cells with blocking agents, BSA or FBS prior to antibody incubation.
- Antibody causes. Antibody overload causes high background. You can reduce the antibody concentration and use the recommended antibody dilutions to ensure the right dose of antibody. Optimize antibody concentration and incubation time based on cellular protein expression. If possible, avoid using biotinylated antibodies.
- Washing causes. Increase the number of washes after staining to ensure that excess antibody is removed.
Abnormal scatter profiles
- Cell causes. Samples should be fresh and properly prepared. Make sure that the cells in the sample are not lysed and broken. Do not centrifuge cells at high rotor speeds or vortex too vigorously. Perform a sieve on the cells to remove any dead cell debris. Also make sure that the sample is not contaminated with bacteria. Bacteria will automatically fluoresce at low levels. Finally, avoid storing stained cells for long periods of time.
For research use only. Not intended for any clinical use.
Send Inquiry
This site is protected by reCAPTCHA and the Google Privacy Policy and Terms of Service apply.