

Immunofluorescence Protocol & Troubleshooting
Immunofluorescence (IF) is a labeled immuno-technology for antigen localization by labeling antibodies with a fluorescent substance. IF can detect and localize various antigens in a variety of cells in different types of tissues. There are two main types, including direct immunofluorescence staining and indirect immunofluorescence staining. The difference between the two is the use of secondary antibodies or not.
For IF, the protocol mainly includes cell preparation, cell fixation, serum containment, primary antibody incubation, labeled secondary antibody incubation, and fluorescence detection. We describe the principles and basic steps of IF, including common methods, solutions and reagents, and detailed operations. The specific operations can be adjusted and varied according to the actual situation and troubleshooting to determine the most suitable method.
Solutions and Reagents
| Stages | Solutions and Reagents |
| Sample Preparation | Phosphate buffer (PBS), formaldehyde fixative, acetone fixative, permeabilization buffer |
| Blocking | Blocking buffer, PBS |
| Antibody Incubation | Primary antibody, fluorescein secondary antibody, antibody dilution buffer, PBS |
| Mounting and Imaging | Mounting media, PBS |
Immunofluorescence Procedure
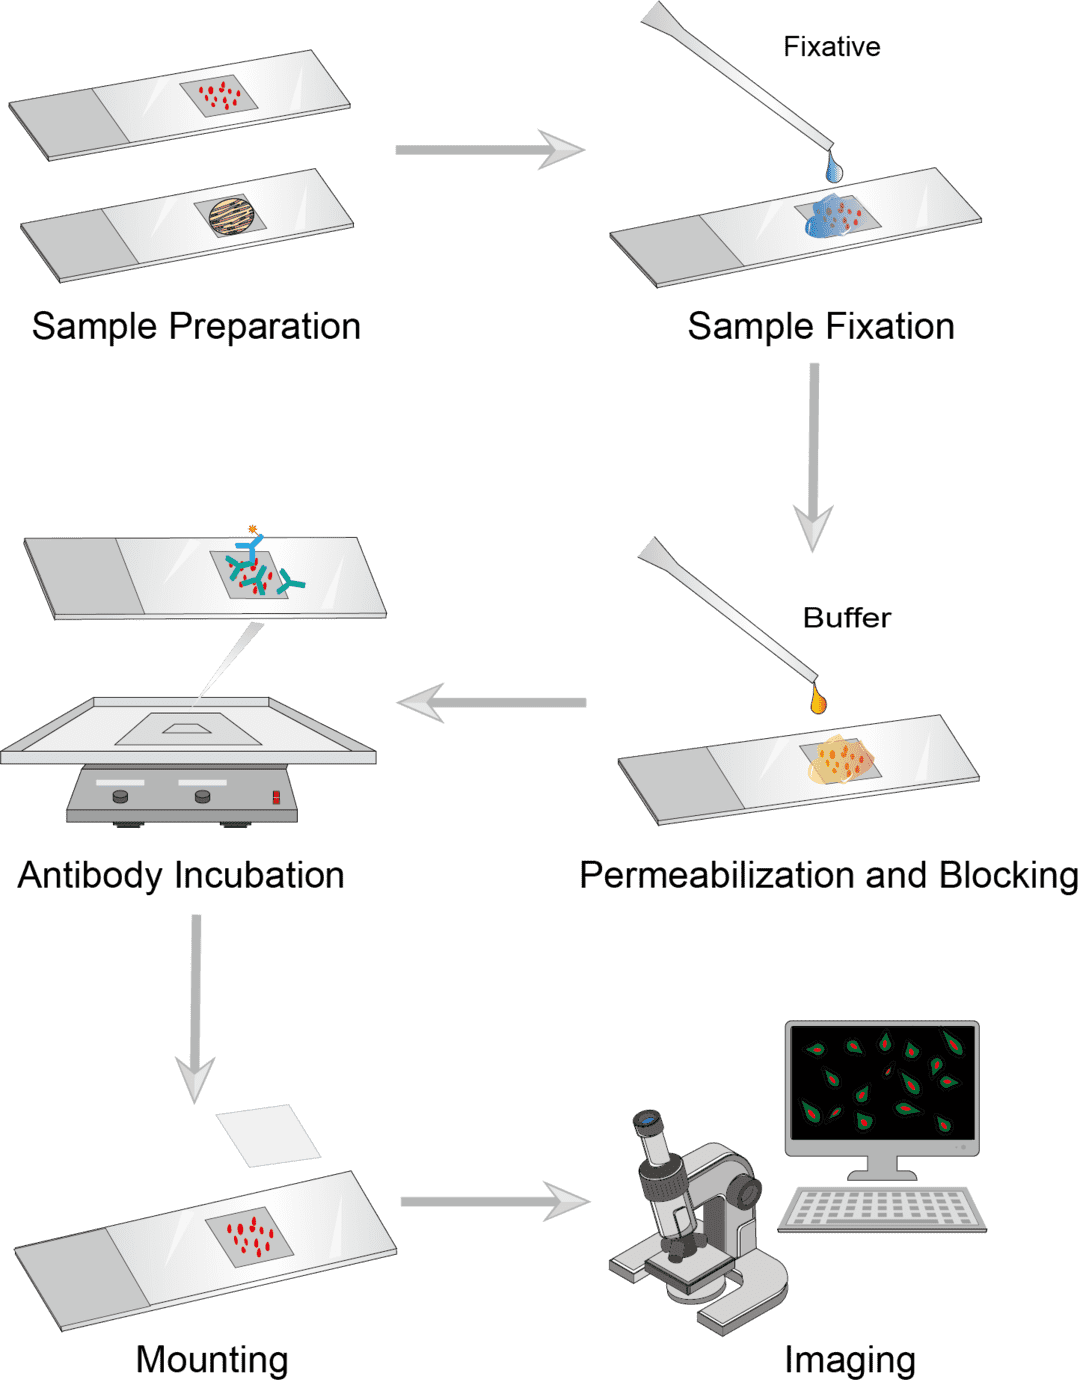
1. Sample Preparation
Suspension-cultured cell samples can be coated directly onto microscope slides in a single layer. Treat the slides to promote cell attachment, and air-dry the slides before proceeding to fixation. Tissue samples should be rapidly dissected and quickly frozen, and the sample blocks should be cut into approximately 6-8 μm sections and affixed to the slides.
2. Sample Fixation
Cover the cells with fixatives and incubate at the appropriate temperature for 10-20 minutes. And then draw out the fixative and rinse with PBS to remove the residual solution. Different fixatives can be selected according to experimental needs. Commonly used fixatives such as methanol, acetone, paraformaldehyde, and formalin.
3. Permeabilization and Blocking
The purpose of the permeabilization treatment is to permeabilize the cell membrane so that the antibody can bind to the antigen inside the cell. Permeabilize with permeabilization buffer for 1-5 minutes at room temperature, then wash with PBS. Blocking the non-specific interaction of primary and secondary antibodies with biological samples enhances IF staining. Incubate samples with blocking agents for 30-60 minutes, such as serum, then wash with PBS.
4. Antibody Incubation
Dilute the primary antibody in the blocking buffer and spread it over the sample. The range of antibody dilution depends on the antigen abundance, the antibody concentration, and the affinity of the antibody. Samples are incubated with primary antibodies and then washed with PBS to remove unbound primary antibodies. Dilute the fluorophore-conjugated secondary antibody in the blocking buffer and add it to the sample. Samples are incubated with the secondary antibody and then washed with PBS.
5. Mounting and Imaging
Before covering the sample with a coverslip, add a small amount of mounting medium sufficient to cover the sample. The sample is then allowed to dry and the edges are sealed. After mounting, the sample can be imaged for observation. Antigens of interest can be visualized by fluorescence microscopy or confocal microscopy.
Troubleshooting
Creative Biolabs has listed some common IF troubleshooting tips. We provide you with tips covering many different problems you may encounter in IF. And we hope this information is useful to you and serves as a useful reference guide.
Weak or no fluorescence expression
- Sample causes. The target antigen may not be present in the sample being tested. You can run a positive control to check if the antigen is inside the cell or on the cell surface. If the antigen is present but not abundant, use an amplification step to maximize the signal. Antigens may be destroyed prior to incubation with the antibody. The target protein should be correctly induced. Determine optimal processing conditions and control conditions for the target antigen. It is important to note that the sample must remain in liquid throughout the staining process.
- Fixation causes. Inadequate or excessive fixation of cells/tissues can result in weakened or lost signals. You should increase/shorten fixation time as appropriate or simply choose another fixation method. If the sample is over fixed resulting in epitope damage, the antigen can be exposed by treatment with antigen repair reagents.
- Permeabilization causes. Poor cell permeabilization can result in staining that does not reach intracellular targets and thus no signal is observed. You can optimize the permeabilization step by increasing the concentration of permeant or the reaction time. If the antibody is lost due to permeabilization, you need to decrease the concentration or reaction time of the permeabilizing agent.
- Antibody causes. First, ensure the suitability of the antibody. Check the function of the antibody by using a positive control and verify that it is recommended for your application. Too low concentrations of antibodies result in too few primary antibodies available to bind to the target antigen. Higher concentrations of antibodies or polyclonal antibodies can be used to enhance the signal and incubate for longer periods of time. You can also perform antibody concentration titrations to find the optimal concentration to optimize antibody conditions. Antibodies may also be inactive and should be reported through an independent test reporting system to assess the viability of the reagent. Antibodies will not work due to improper storage. Freezing/thawing cycles of antibodies are harmful and antibodies should be stored according to instructions.
- Secondary antibody causes. If the primary and secondary antibodies are incompatible, little or no fluorescence will be observed. You need to make sure that the type of secondary antibody matches the type of primary antibody. This can also occur if the secondary antibody is incompatible with the serum protein used for blocking. So, you need to avoid cross-reactivity between the secondary antibody and the immunoglobulin in the blocking agent.
- Microscope causes. First make sure you have selected the proper microscope detection method, if not, you will need to use a more sensitive image acquisition method or use a brighter fluorophore for detection. Check dye excitation/emission settings to make sure your microscope is equipped with the correct light source and filter set for the fluorophore. You also can turn up the gain or increase the exposure time to ensure that you capture any signal present.
High background
- Sample causes. The sample must be kept in liquid throughout the procedure to avoid drying of the sample. Check the autofluorescence of the tissue sample. Check if sections are too thick, consider using thinner tissue sections. If permeabilization destroys the cells, the permeabilization step should be reduced or skipped.
- Antibody causes. If the signal and background are high, the antibody concentration may be too high, the incubation time too long, or the incubation temperature too high. You need to reduce the antibody concentration, dilute according to the recommended antibody dilution and optimize the antibody conditions. Try running the secondary antibody without the primary antibody. If there is staining, this indicates that non-specific binding has occurred. The secondary antibody should be replaced. It is also possible that the antibody and protein are interacting hydrophobically, you can reduce the ionic strength of the antibody diluent.
- Fixation causes. Improper or excessively long fixation can cause artifacts. Reduce fixation time or change fixative to reduce noise.
- Blocking causes. If a high level of background is present, it may be caused by insufficient blocking. Please consider changing the blocking solution or increasing the blocking time.
- Washing causes. It is critical to wash correctly between steps. Make sure you follow the protocol guidelines for the wash steps.
Fast fluorescence quenching
Too large or too small a precipitation ring can result in inaccurate ring diameter measurements.
- Fluorescein causes. The reason may be the poor stability of fluorescein. A fluorescein secondary antibody with good light stability can be used. Or use a sealer that prevents fluorescence burst.
We are committed to helping you achieve superior research results through the protocol. If you need more help with your experiments, please contact us for more assistance.
Products with Tested Data
At Creative Biolabs, we are dedicated to providing high-quality antibodies for various research applications. Each product in our extensive range has been rigorously tested to ensure superior reliability and efficacy. To showcase the performance of our antibodies, we have conducted numerous experiments using Immunofluorescence (IF) assay. Below, you will find a table listing a selection of our antibody products along with images from these experiments, demonstrating their proven reliability.
| Product Name | Catalog Number | Target | Image | Description |
|---|---|---|---|---|
| Mouse Anti-HSP90AB1 Recombinant Antibody (MOB-0049F) | HSP90AB1 | HSP90AB1 |

|
Immunofluorescence analysis of mouse spleen tissue. 1. HSP90β monoclonal antibody (M2) (red) is diluted at 1:200 (4°C, overnight). 2. The Cy3 labeled secondary antibody was diluted 1:300 (room temperature, 50 minutes). 3. Picture B: DAPI (blue) for 10 minutes. Figure A: Goal. Picture B: DAPI. Picture C: The merger of A+B. |
| Mouse Anti-IκB β Recombinant Antibody (clone 1F3) | IκB β | IκB β |

|
Immunofluorescence analysis of human liver cancer tissue. 1. IκBβ monoclonal antibody (1F3) (red) is diluted 1:200 (4°C, overnight). 2. The Cy3 labeled secondary antibody was diluted 1:300 (room temperature, 50 minutes). 3. Picture B: DAPI (blue) for 10 minutes. Figure A: Goal. Picture B: DAPI. Picture C: The merger of A+B. |
| Mouse Anti-H3F3A Recombinant Antibody (clone 3G3) | H3F3A (Tri Methyl Lys79) | H3F3A (Tri Methyl Lys79) |

|
Immunofluorescence analysis of Hela cells. 1. Bek polyclonal antibody (green) is diluted at 1:200 (overnight at 4°C). (Red) Dilute at 1:200 (overnight at 4°C). 2. Goat anti-rabbit Alexa Fluor 488 diluted 1:1000 (room temperature, 50 minutes). Goat Anti Mouse Alexa Fluor594 diluted 1:1000 (room temperature, 50 minutes). |
| Mouse Anti-HSP70 Recombinant Antibody (clone 3G10) | HSP70 | HSP70 |

|
Immunofluorescence analysis of Hela cells. 1. AIM2 polyclonal antibody (red) was diluted at 1:200 (overnight at 4°C). HSP70 monoclonal antibody (3G10) (green) was diluted at 1:200 (overnight at 4°C). 2. Goat anti-rabbit Alexa Fluor 594 diluted 1:1000 (room temperature, 50 minutes). Goat Anti Mouse Alexa Fluor 488 is diluted 1:1000 (room temperature, 50 minutes). |
| Mouse Anti-H3F3A Recombinant Antibody (clone 1G1) | H3F3A | H3F3A |

|
Immunofluorescence analysis of Hela cells. 1. Amyloid β polyclonal antibody (green) is diluted at 1:200 (overnight at 4°C). (Red) Dilute at 1:200 (overnight at 4°C). 2. Goat anti-rabbit Alexa Fluor 488 diluted 1:1000 (room temperature, 50 minutes). Goat Anti Mouse Alexa Fluor594 diluted 1:1000 (room temperature, 50 minutes). |
| Mouse Anti-CASP3 Recombinant Antibody (clone 5E1) | CASP3 | CASP3 |

|
Immunofluorescence analysis of rat-lung tissue. 1.FoxO1 (phospho Ser256) Polyclonal Antibody(red) was diluted at 1:200 (4°C overnight). Active Caspase-3 Monoclonal Antibody (green) was diluted at 1:200 (4° overnight). 2, Goat Anti Rabbit Alexa Fluor 594 AS0333 was diluted at 1:1000 (room temperature, 50min). Goat Anti Mouse Alexa Fluor 488 AS0784 was diluted at 1:1000 (room temperature, 50min) |
| Mouse Anti-LC3A Recombinant Antibody (clone 5G10) | LC3A | LC3A |

|
Immunofluorescence analysis of Hela cells. 1. CREB-1 polyclonal antibody (red) is diluted 1:200 (overnight at 4°C). The LC3A mouse monoclonal antibody (5G10) (green) was diluted at 1:200 (overnight at 4°C). 2. Goat anti-rabbit Alexa Fluor 594 diluted 1:1000 (room temperature, 50 minutes). Goat Anti Mouse Alexa Fluor 488 is diluted 1:1000 (room temperature, 50 minutes). |
| Mouse Anti-LTF Recombinant Antibody (MOB-0072F) | LTF | LTF |

|
Immunofluorescence analysis of human lung cancer tissue. 1. Lactoferrin monoclonal antibody (Q100) (red) is diluted at 1:200 (4°C, overnight). 2. The Cy3 labeled secondary antibody was diluted 1:300 (room temperature, 50 minutes). 3. Picture B: DAPI (blue) for 10 minutes. Figure A: Goal. Picture B: DAPI. Picture C: The merger of A+B. |
| Mouse Anti-Kif 7 Recombinant Antibody (clone 3F8) | Kif 7 | Kif 7 |

|
Immunofluorescence analysis of Hela cells. 1. C/EBP β polyclonal antibody (red) was diluted at 1:200 (overnight at 4°C). Kif 7 Monoclonal Antibody (3F8) (green) is diluted at 1:200 (overnight at 4°C). 2. Goat anti-rabbit Alexa Fluor 594 diluted 1:1000 (room temperature, 50 minutes). Goat Anti Mouse Alexa Fluor 488 is diluted 1:1000 (room temperature, 50 minutes). |
| Mouse Anti-MKI67 Recombinant Antibody (clone 4A8) | MKI67 | MKI67 |

|
Immunofluorescence analysis of Hela cells. 1. Annexin VI polyclonal antibody (green) diluted 1:200 (overnight at 4°C). (Red) Dilute at 1:200 (overnight at 4°C). 2. Goat anti-rabbit Alexa Fluor 488 diluted 1:1000 (room temperature, 50 minutes). Goat Anti Mouse Alexa Fluor594 diluted 1:1000 (room temperature, 50 minutes). |
| Mouse Anti-LMNB1 Recombinant Antibody (clone 7C11) | LMNB1 | LMNB1 |

|
Immunofluorescence analysis of Hela cells. 1. AMPKα1/2 (phosphoThr183/172) polyclonal antibody (green) is diluted at 1:200 (overnight at 4°C). (Red) Dilute at 1:200 (overnight at 4°C). 2. Goat anti-rabbit Alexa Fluor 488 is diluted 1:1000 (room temperature, 50 minutes). Goat anti-mouse Alexa Fluor 594 is diluted 1:1000 (room temperature, 50 minutes). |
| Rabbit Anti-DDX5 Recombinant Antibody (clone 2C3) | DDX5 | DDX5 |

|
Immunofluorescence staining of HepG2 Cells with this product at 1:50, counter-stained with DAPI. The cells were fixed in 4% formaldehyde, permeated by 0.2% TritonX-100, and blocked in 10% normal Goat Serum. The cells were then incubated with the antibody overnight at 4°C. Nuclear DNA was labeled in blue with DAPI. The secondary antibody was FITC-conjugated Goat Anti-Rabbit IgG (H+L). |
| Rabbit Anti-TP53 Recombinant Antibody (clone 7A9) | TP53 | TP53 |

|
Immunofluorescence staining of HepG2 Cells with ZG-0131U at 1:50, counter-stained with DAPI. The cells were fixed in 4% formaldehyde, permeated by 0.2% TritonX-100, and blocked in 10% normal Goat Serum. The cells were then incubated with the antibody overnight at 4°C. Nuclear DNA was labeled in blue with DAPI. The secondary antibody was FITC-conjugated Goat Anti-Rabbit IgG (H+L). |
| Rabbit Anti-Phospho-PRKDC (S2056) Recombinant Antibody (clone 4A4) | PRKDC | PRKDC |

|
Immunofluorescence staining of Hela cells(treated with UV) with ZG-0524U at 1:100, counter-stained with DAPI. The cells were fixed in 4% formaldehyde, permeabilized using 0.2% Triton X-100 and blocked in 10% normal Goat Serum. The cells were then incubated with the antibody overnight at 4°C. The secondary antibody was Alexa Fluor 488-congugated Goat Anti-Rabbit IgG (H+L). |
| Rabbit Anti-Phospho-RAF1 (S43) Recombinant Antibody (clone 1F7) | RAF1 | RAF1 |

|
Immunofluorescence staining of Hela with ZG-0541U at 1:100, counter-stained with DAPI. The cells were fixed in 4% formaldehyde, permeabilized using 0.2% Triton X-100 and blocked in 10% normal Goat Serum. The cells were then incubated with the antibody overnight at 4°C. The secondary antibody was Alexa Fluor 488-congugated Goat Anti-Rabbit IgG (H+L). |
| Mouse Anti-Luciferase Recombinant Antibody (clone 6B8) | Luciferase | Luciferase |

|
Immunofluorescence analysis of HEK293T cells transfected with luciferase. 1. Luciferase mouse monoclonal antibody (6B8) (green) diluted at 1:200 (4°C, overnight). 2. Dylight 488 labeled secondary antibody is diluted at 1:300 room temperature for 30 minutes (DAPI (blue) for 10 minutes. |
| Mouse Anti-MICU1 Recombinant Antibody (MOB-0105F) | MICU1 | MICU1 |

|
Immunofluorescence analysis of Hela cells. 1. The c-Myc polyclonal antibody (red) is diluted at 1:200 (overnight at 4°C). MICU1 monoclonal antibody (mix) (green) was diluted 1:200 (overnight at 4°C). 2. Goat anti-rabbit Alexa Fluor 594 diluted 1:1000 (room temperature, 50 minutes). Goat Anti Mouse Alexa Fluor 488 is diluted 1:1000 (room temperature, 50 minutes). |
| Rabbit Anti-ERBB3 Recombinant Antibody (clone 6F6) | ERBB3 | ERBB3 |

|
Immunofluorescence staining of MCF7 Cells with ZG-0128U at 1:50, counter-stained with DAPI. The cells were fixed in 4% formaldehyde and blocked in 10% normal Goat Serum. The cells were then incubated with the antibody overnight at 4°C. Nuclear DNA was labeled in blue with DAPI. The secondary antibody was FITC-conjugated Goat Anti-Rabbit IgG (H+L). |
| Mouse Anti-RPS27 Recombinant Antibody (ZG-067R) | RPS27 | RPS27 |

|
Confocal immunofluorescence analysis of Hela cells (A), BCBL-1 cells (B) and L1210 cells (C) using Ribosomal Protein S27 monoclonal antibody (green). Blue: DRAQ5 fluorescent DNA dye. |
| Mouse Anti-ATG5 Recombinant Antibody (clone 3C7) | ATG5 | ATG5 |

|
Immunofluorescence analysis of Hela cell. 1, CREB-1 Polyclonal Antibody(red) was diluted at 1:200(4°C overnight). 1.ATG5 mouse Monoclonal Antibody (green) was diluted at 1:200 (4°C overnight). 2, Goat Anti Rabbit Alexa Fluor 594 was diluted at 1:1000 (room temperature, 50min). Goat Anti Mouse Alexa Fluor 488 was diluted at 1:1000 (room temperature, 50min) |
| Mouse Anti-ATG7 Recombinant Antibody (clone 3D6) | ATG7 | ATG7 |

|
Immunofluorescence analysis of mouse-spleen tissue. 1.ATG7 Mouse Monoclonal Antibody (red) was diluted at 1:200 (4°C, overnight). 2, Cy3 labled Secondary Antibody was diluted at 1:300 (room temperature, 50min).3, Picture B: DAPI(blue) 10min. Picture A:Target. Picture B: DAPI.Picture C: merge of A+B |
| Mouse Anti-RTN3 Recombinant Antibody (ZG-075R) | RTN3 | RTN3 |

|
Confocal immunofluorescence analysis of Hela (A), A431 (B) and THP-1 (C) cells using Rtn-3 monoclonal antibody (green). Blue: DRAQ5 fluorescent DNA dye. |
| Mouse Anti-RTN1 Recombinant Antibody (clone MON162) | RTN1 | RTN1 |

|
Indirect immunofluorescence staining of reticulon-1A/NSP-A in rat brain frozen section using the antibody (clone MON162) at a 1:500 dilution. |
| Mouse Anti-NEFM Recombinant Antibody (clone RNF403) | NEFM | NEFM |

|
Indirect immunofluorescent detection of the 160 kDa neurofilament protein in rat brain using anti-NEFM antibody (RNF403; dilution 1:100). |
| Rabbit Anti-VIM Recombinant Antibody (clone RV205) | VIM | VIM |

|
Indirect immunofluorescence staining of normal human dermal fibroblasts in tissue culture with the antibody (diluted 1:100), showing the specific cytoskeletal pattern of vimentin intermediate filaments. |
| Mouse Anti-ACTA2 Recombinant Antibody (clone HHF35) | ACTA2 | ACTA2 |

|
Indirect immunofluorescence staining of frozen section of chicken gizzard with anti-ACTA2 antibody (HHF35) showing specific positive staining of smooth muscle cells. |
| Mouse Anti-ENO2 Recombinant Antibody (clone 13E2) | ENO2 | ENO2 |

|
Immunofluorescence analysis of Hela cells. 1. Cdk2 polyclonal antibody (red) was diluted at 1:200 (overnight at 4°C). NSE monoclonal antibody (13E2) (green) was diluted at 1:200 (overnight at 4°C). 2. Goat anti-rabbit Alexa Fluor 594 diluted 1:1000 (room temperature, 50 minutes). Goat Anti Mouse Alexa Fluor 488 is diluted 1:1000 (room temperature, 50 minutes). |
| Mouse Anti-MAP2 Recombinant Antibody (clone 7D4) | MAP2 | MAP2 |

|
Immunofluorescence analysis of Hela cells. 1. AQP2 polyclonal antibody (green) is diluted at 1:200 (overnight at 4°C). (Red) Dilute at 1:200 (overnight at 4°C). 2. Goat anti-rabbit Alexa Fluor 488 diluted 1:1000 (room temperature, 50 minutes). Goat Anti Mouse Alexa Fluor594 diluted 1:1000 (room temperature, 50 minutes). |
| Mouse Anti-ACTA1 Recombinant Antibody (clone 4B11) | α skeletal muscle actin | α skeletal muscle actin |

|
Immunofluorescence analysis of Human-liver-cancer tissue. 1, α skeletal muscle actin monoclonal antibody (4B11) (red) was diluted at 1:200 (4°C C, overnight). 2, Cy3 labled Secondary antibody was diluted at 1:300 (room temperature, 50 min). 3, Picture B: DAPI (blue) 10 min. Picture A:Target. Picture B: DAPI. Picture C: merge of A+B |
| Mouse Anti-CASP8 Recombinant Antibody (clone 2G12) | CASP8 | CASP8 |

|
Immunofluorescence analysis of Hela cell. 1.ERα Polyclonal Antibody(red) was diluted at 1:200 (4°C overnight). Caspase-8 Monoclonal Antibody (green) was diluted at 1:200 (4°C overnight). 2, Goat Anti Rabbit Alexa Fluor 594 was diluted at 1:1000 (room temperature, 50min). Goat Anti Mouse Alexa Fluor 488 was diluted at 1:1000 (room temperature, 50min). |
| Mouse Anti-KRT8 Recombinant Antibody (clone RCK102) | KRT8 | KRT8 |

|
Indirect immunofluorescence staining of a frozen section of human urinary bladder using the antibody (clone RCK102) at a 1:200 dilution. Note strong staining of urothelium and no reactivity in the connective tissue or muscle tissue. |
| Mouse Anti-XRCC4 Recombinant Antibody (clone 5C10) | XRCC4 | XRCC4 |

|
Immunofluorescence analysis of Hela cell. 1, Bak Polyclonal Antibody (green) was diluted at 1:200 (4°C overnight). XRCC4 monoclonal Antibody (red) was diluted at 1:200 (4°C overnight). 2, Goat Anti-Rabbit Alexa Fluor 488 was diluted at 1:1000 (room temperature, 50 min). Goat Anti-Mouse Alexa Fluor 594 was diluted at 1:1000 (room temperature, 50 min). |
| Mouse Anti-ACTA2 Recombinant Antibody (clone 6A12) | α-SMA | α-SMA |

|
Immunofluorescence analysis of Hela cell. 1, c-Fos Polyclonal Antibody (red) was diluted at 1:200 (4°C overnight). α-SMA monoclonal antibody (6A12) (green) was diluted at 1:200 (4°C overnight). 2, Goat Anti-Rabbit Alexa Fluor 594 was diluted at 1:1000 (room temperature, 50 min). Goat Anti-Mouse Alexa Fluor 488 was diluted at 1:1000 (room temperature, 50 min). |
| Mouse Anti-MyHCs Recombinant Antibody (clone 11C2) | MyHCs | MyHCs |

|
The nematode tissue was immunofluorescently stained with MYH Mouse mAb (11C2) diluted 1:100. |
| Mouse Anti-EGFR Recombinant Antibody (clone 1B10) | EGFR | EGFR |

|
IF analysis of Hela with Antibody (Left) and DAPI (Right) diluted at 1:100. |
| Mouse Anti-DES Recombinant Antibody (clone 1B12) | DES | DES |

|
Immunofluorescence analysis of human-uterus tissue. 1, Desmin Monoclonal Antibody (1B12) (red) was diluted at 1:200 (4°C, overnight). 2, Cy3 labled Secondary antibody was diluted at 1:300 (room temperature, 50 min). 3, Picture B: DAPI (blue) 10 min. Picture A:Target. Picture B: DAPI. Picture C:merge of A+B |
| Mouse Anti-HAO1 Antibody (clone Mix) | HAO1 | HAO1 |

|
Immunofluorescence analysis of Hela cell. 1, Chk2 (phospho Thr68) Polyclonal Antibody (red) was diluted at 1:200 (4° overnight). HAO1 Monoclonal Antibody (Mix) (green) was diluted at 1:200 (4° overnight). 2, Goat Anti Rabbit Alexa Fluor 594 was diluted at 1:1000 (room temperature, 50 min). Goat Anti Mouse Alexa Fluor 488 was diluted at 1:1000 (room temperature, 50 min). |
| Mouse Anti-TUBE1 Recombinant Antibody (clone 3G1) | TUBE1 | TUBE1 |

|
Immunofluorescence analysis of human-stomach tissue. 1, Epsilon Tubulin Mouse Antibody (3G1) (red) was diluted at 1:200 (4°C, overnight). 2, Cy3 labled Secondary antibody was diluted at 1:300 (room temperature, 50 min). 3, Picture B: DAPI (blue) 10 min. Picture A:Target.Picture B: DAPI. Picture C: merge of A+B |
| Mouse Anti-MAPK3 Recombinant Antibody (clone 5E9) | MAPK3 | MAPK3 |

|
Immunofluorescence analysis of rat-spleen tissue. 1, ERK1 Mouse Monoclonal Antibody (5E9) (red) was diluted at 1:200 (4°C, overnight). 2, Cy3 labled Secondary antibody was diluted at 1:300 (room temperature, 50 min). 3, Picture B: DAPI (blue) 10 min. Picture A:Target. Picture B: DAPI.Picture C: merge of A+B |
| Mouse Anti-LGALS3 Recombinant Antibody (clone 6G2) | LGALS3 | LGALS3 |

|
Immunofluorescence analysis of Hela cell. 1, APC Polyclonal Antibody (red) was diluted at 1:200 (4° overnight). Galectin-3 Monoclonal Antibody (6G2) (green) was diluted at 1:200 (4° overnight). 2, Goat Anti Rabbit Alexa Fluor 594 was diluted at 1:1000 (room temperature, 50 min). Goat Anti Mouse Alexa Fluor 488 was diluted at 1:1000 (room temperature, 50 min). |
| Mouse Anti-NBR1 Recombinant Antibody (clone 7C3) | NBR1 | NBR1 |

|
Immunofluorescence analysis of rat spleen tissue. 1. NBR1 mouse monoclonal antibody (7C3) (red) was diluted 1:200 (4°C, overnight). 2. The Cy3 labeled secondary antibody was diluted 1:300 (room temperature, 50 minutes). 3. Picture B: DAPI (blue) for 10 minutes. Figure A: Goal. Picture B: DAPI. Picture C: The merger of A+B. |
| Mouse Anti-GAPDH Recombinant Antibody (clone 2B8) | GAPDH | GAPDH |

|
Immunofluorescence analysis of Hela cell. 1, Cyclin D1 Polyclonal Antibody (red) was diluted at 1:200 (4° overnight). GAPDH Monoclonal Antibody (2B8) (green) was diluted at 1:200 (4° overnight). 2, Goat Anti Rabbit Alexa Fluor 594 was diluted at 1:1000 (room temperature, 50 min). Goat Anti Mouse Alexa Fluor 488 was diluted at 1:1000 (room temperature, 50 min). |
| Mouse Anti-HIST1H2BB Antibody (clone Mix) | HIST1H2BB | HIST1H2BB |

|
Immunofluorescence analysis of Hela cell. 1, Brp44L Polyclonal Antibody (green) was diluted at 1:200 (4° overnight). (red) was diluted at 1:200 (4° overnight). 2, Goat Anti Rabbit Alexa Fluor 488 was diluted at 1:1000 (room temperature, 50 min). Goat Anti Mouse Alexa Fluor 594 was diluted at 1:1000 (room temperature, 50 min). |
| Mouse Anti-RELA Recombinant Antibody (clone 5G6) | RELA | RELA |

|
Immunofluorescence analysis of Hela cells. 1. BMP-2 polyclonal antibody (green) diluted 1:200 (overnight at 4°C). (Red) Dilute at 1:200 (overnight at 4°C). 2. Goat anti-rabbit Alexa Fluor 488 diluted 1:1000 (room temperature, 50 minutes). Goat Anti Mouse Alexa Fluor594 diluted 1:1000 (room temperature, 50 minutes). |
| Mouse Anti-ERBB2 Recombinant Antibody (clone 11H9) | ERBB2 | ERBB2 |

|
Immunofluorescence analysis of Hela cell. 1, E2F-1 Polyclonal Antibody (red) was diluted at 1:200 (4° overnight). HER2 Monoclonal Antibody (11H9) (green) was diluted at 1:200 (4° overnight). 2, Goat Anti Rabbit Alexa Fluor 594 was diluted at 1:1000 (room temperature, 50 min). Goat Anti Mouse Alexa Fluor 488 was diluted at 1:1000 (room temperature, 50 min). |
| Mouse Anti-LacZ Recombinant Antibody (clone 3B7D5) | LacZ | LacZ |

|
Immunofluorescence staining of 293T cells transfected with ZG-0244U at 1:100, counter-stained with DAPI. The cells were fixed in 4% formaldehyde and blocked in 10% normal Goat Serum. The cells were then incubated with the antibody overnight at 4°C. The secondary antibody was Alexa Fluor 488-congugated Goat Anti-Rabbit IgG(H+L). The image on the right is the 293T cells transfected without lacZ antibody |
| Rat Anti-LAMC1 Antibody (clone A5) | LAMC1 | LAMC1 |

|
Immunofluorescence staining of frozen sections from human colon (methanol fixed) using the antibody, showing the localization of laminin in the connective tissue and in basement membranes surrounding the epithelial crypts and villi. |
| Mouse Anti-Cardiotin Recombinant Antibody (clone R2G) | Cardiotin | Cardiotin |

|
Indirect immunofluorescence staining of swine heart with the antibody (R2G) showing positive staining of mitochondria in cardiomyocytes. |
| Rabbit Anti-Phospho-RPA2 (T21) Recombinant Antibody (clone 3B2) | RPA2 | RPA2 |

|
Immunofluorescence staining of Hela cells with ZG-0550U at 1:100, counter-stained with DAPI. The cells were fixed in 4% formaldehyde, permeabilized using 0.2% Triton X-100 and blocked in 10% normal Goat Serum. The cells were then incubated with the antibody overnight at 4°C. The secondary antibody was Alexa Fluor 488-congugated Goat Anti-Rabbit IgG (H+L). |
| Rabbit Anti-SKP2 Recombinant Antibody (clone 3C11) | SKP2 | SKP2 |

|
Immunofluorescence staining of HepG2 Cells with ZG-0562U at 1:50, counter-stained with DAPI. The cells were fixed in 4% formaldehyde, permeated by 0.2% TritonX-100, and blocked in 10% normal Goat Serum. The cells were then incubated with the antibody overnight at 4°C. Nuclear DNA was labeled in blue with DAPI. The secondary antibody was FITC-conjugated Goat Anti-Rabbit IgG (H+L). |
For research use only. Not intended for any clinical use.
Send Inquiry
This site is protected by reCAPTCHA and the Google Privacy Policy and Terms of Service apply.