

Knockout/Knockdown Target Confirmation by Western Blot Protocol & Troubleshooting
Knockdown and knockout are two methods used to silence the target gene of interest. Good implementation of these techniques can enable researchers to better identify and validate meaningful targets in disease treatment. Western blot can be used to confirm the effect of gene knockdown/knockout.
Creative Biolabs is able to effectively and successfully validate knockout/knockdown using the western blot method. As a leader in biotechnology, we offer advanced protocols for western blot validation of target knockout/knockdown to facilitate researchers' research progress in disease research, therapeutic development with innovative products and services.
Solutions and Reagents
| Stages | Solutions and Reagents |
| Sample Preparation | Lysis buffer, sample buffer |
| Electrophoresis and Blotting | Loading buffer, running buffer, transfer buffer |
| Immunodetection | Blocking buffer, antibody, antibody buffer, developing solution, stop solution, wash buffer |
Knockout/Knockdown Target Confirmation by Western Blot Procedure
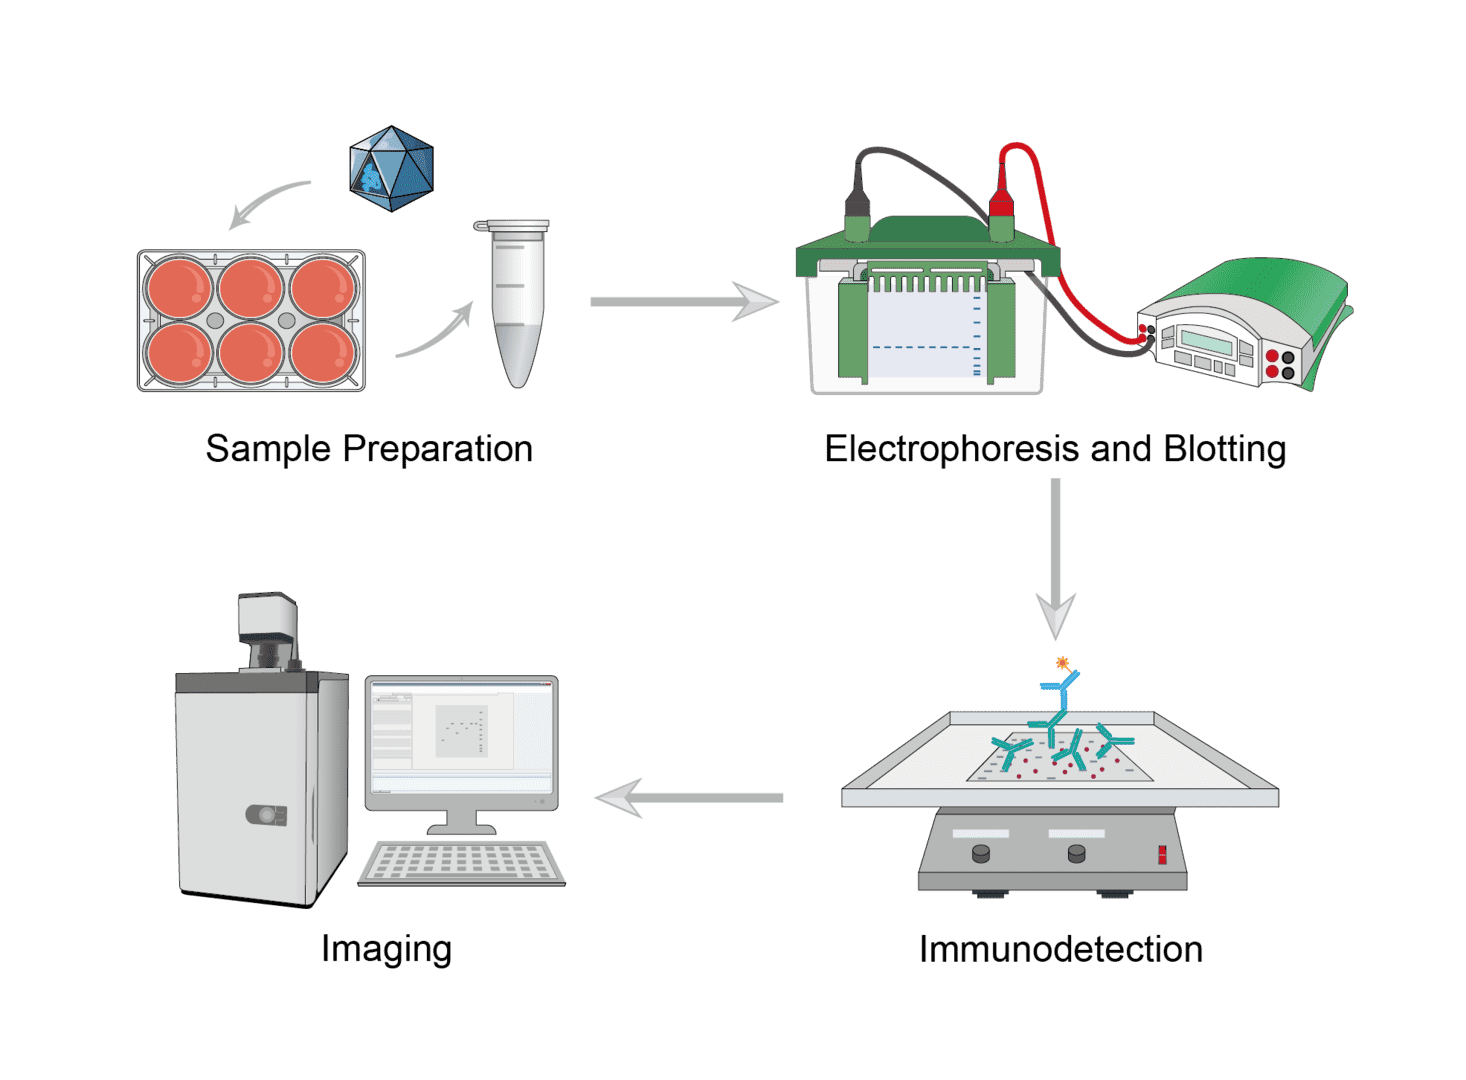
1. Sample Preparation
Seed cells into 6-well plates for culture. Transfect the cells with a guide vector to achieve knockout/knockdown of the target gene. Collect cells after transfection. Prepare lysates from untargeted control cells and knockout/knockdown cells. Determine the amount of loaded protein and add an equal volume of sample buffer.
2. Electrophoresis and Blotting
Load protein samples onto the gel and run electrophoresis according to the manufacturer's protocol. Transfer proteins from the gel to the PVDF membrane by semi-dry transfer using a transfer system according to the manufacturer's protocol.
3. Immunodetection
Place the membrane in the blotting vessel, add enough blocking solution to cover the entire membrane surface and shake to incubate. This can help to reduce background noise while enhancing the target protein signal. Incubate the membrane with the diluted primary antibody, wash the membrane at the end of the incubation to remove excess primary antibody, continue incubation with a good selection of secondary antibodies in the blocking buffer, finally wash to remove excess secondary antibody.
4. Imaging
Select signal imaging reagents for detection. The protein blot lanes in control and knockout/knockdown samples are shown together and show the relative residual intensity after silencing. Downregulation of antibody signaling confirms knockdown/knockout of the corresponding gene.
Troubleshooting
No bands for both control and validation
- Antibody causes. If an unsuitable antibody is used, either primary or secondary antibody, the bands will not show up and the concentration of the antibody should be appropriate, too low and no signal may be seen.
- Buffer solution cause. Check and make sure that the buffer solution is not contaminated, and that the wash time is too long can also cause a reduced signal.
Faint bands for both control and validation
- Antibody concentration causes. Low concentrations of antibodies may result in weak signals, and increase the exposure time to help make the bands clearer.
- Incubation reagent causes. When incubating antibodies, BSA or skim milk is typically used. This may mask the antigen, so should be used in reduced amounts when this occurs.
Patchy and uneven spots on the blot
- Transferring causes. If there are air bubbles between the gel and the membrane, or improper use of the shaker, or uneven mixing during the incubation process, these can cause the situation.
- Blocking agent causes. This problem can also be caused by antibodies bound to the blocker. In this case, you should choose an alternative blocker or filter the blocker to remove the contaminant.
- Secondary antibody causes. Aggregation of secondary antibodies causes blotting on the blot. The secondary antibodies should be centrifuged and filtered to remove the aggregates.
Generate bands at unexpected locations
- Protease degradation causes. If unexpected bands appear, they may be due to degradation of the protease. In this case, you should use a fresh sample kept on ice or choose another antibody.
- Gel causes. Uneven gel interface, uneven heating of the gel, unsuitable buffer concentration etc. can cause uneven bands. This problem can be solved by optimizing the gel.
- Sample wells causes. Poor polymerization around sample pores may cause skewed bands.
- If white bands appear, they may be due to too much protein or antibody.
High background on the blot
- Antibody concentration causes. Due to the high antibody concentration, the antibody will bind to the PVDF membrane.
- Gel causes. Gels that have been used for too long and are too old can lead to high background ground resolution. This can be improved by replacing the gel or increasing the wash time.
- Exposure causes. Overexposure can also cause this problem. You can check different exposure times to choose the best result.
We hope you will use our recommended protocols and troubleshooting guides to get the best results in knockout/knockdown target confirmation by western blot. To learn about our antibody products and services, contact us to get information on how to get validation success in western blotting.
For research use only. Not intended for any clinical use.
Send Inquiry
This site is protected by reCAPTCHA and the Google Privacy Policy and Terms of Service apply.