

Immunodiffusion Protocol & Troubleshooting
Immunodiffusion is a diagnostic test. Antigens and antibodies diffuse and react with each other in an agar medium to form a precipitate. It is used to detect and quantify antibody/antigen content. There are two common ways of diffusion. One way is that one of the antibodies/antigens remains fixed while the other reagent moves. The other way is that the antigen and antibody move towards each other.
Compared to other available methods, immunodiffusion assays have the advantages of being inexpensive, reliable, and reproducible. We briefly describe the single immunodiffusion technique procedure, which can provide you with possible reagent/solution and specific assay services. It can be used in immunology to determine antigen content, identify immunoglobulin classes, evaluate antibodies, etc.
Solutions and Reagents
| Stages | Solutions and Reagents |
| Agar Preparation | Antibody solution, ionic agar or saline agar, PBS |
| Standard Preparation | Buffer, standard antigen solution |
| Sample Loading | Antigen |
Immunodiffusion Procedure
In the immunodiffusion method, the antibodies are uniformly distributed in an agar gel and the sample containing the target antigen is placed in wells within the gel for diffusion. The antigen reacts with the antibody to form a precipitation loop. The antigen concentration is determined by measuring the diameter of the precipitation loop and extrapolating using a standard curve.
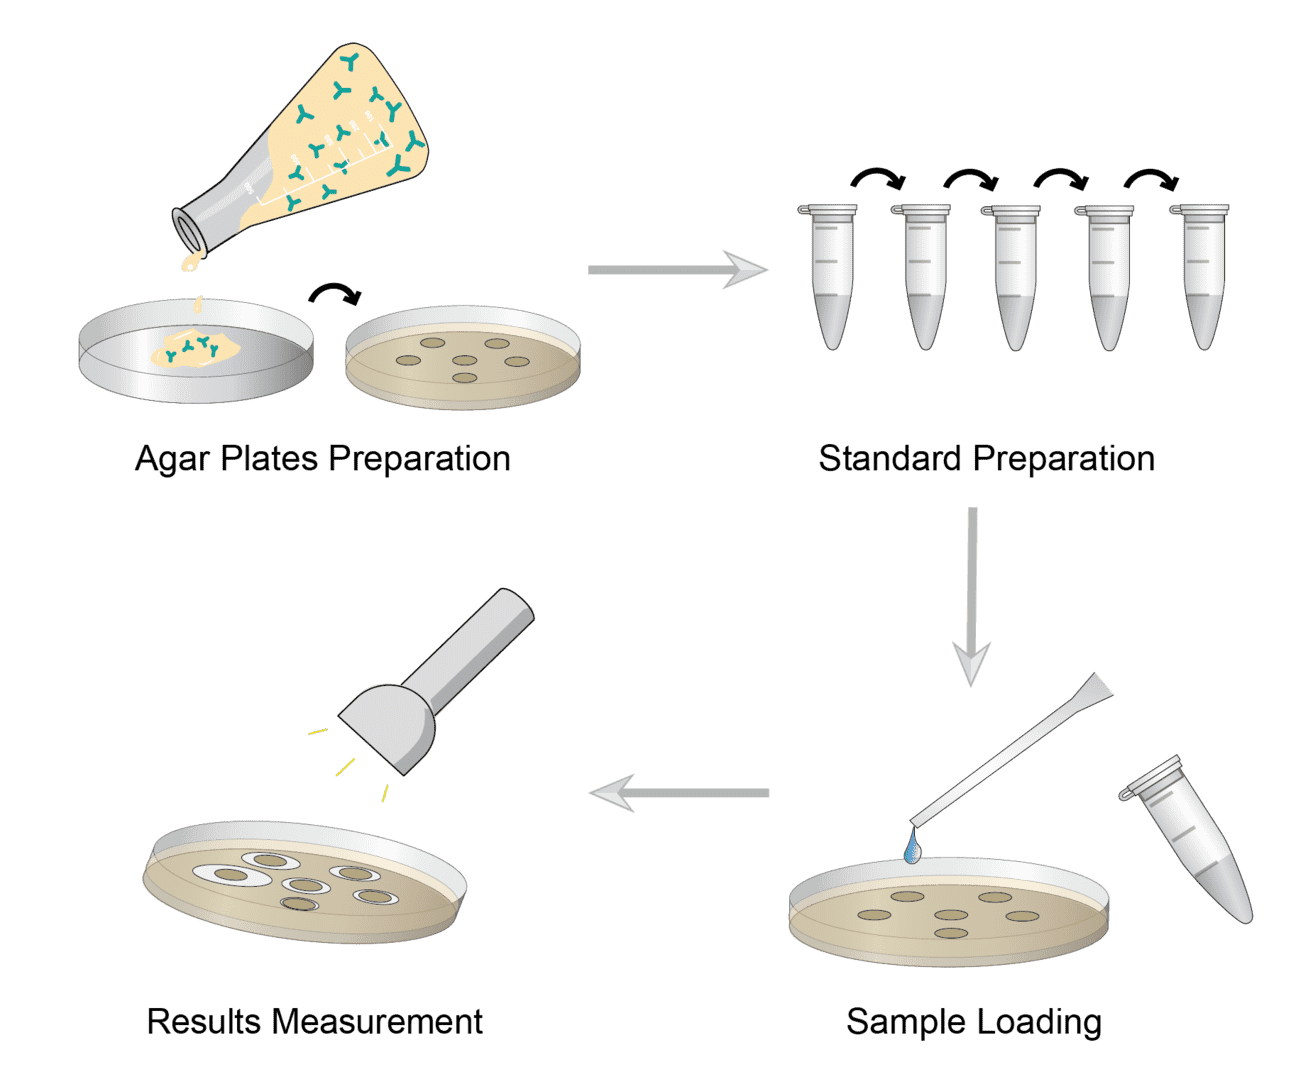
1. Agar Plates Preparation
Prepare agar plates according to plate size. Dilute the known specific antibody with PBS, preheat and pour into dissolved agar solution, mix the antibody and agar well and pour on the plate. After solidification, place the agar plate on the template and use a good cutter to cut the wells in a gentle manner, then remove excess agarose.
2. Standard Preparation
Dilute the standards at different concentrations according to the instructions for the standard reference protein product. The serial dilution method can be used.
3. Sample Loading
Number the wells at the bottom of the plate. Load different concentrations of standards using the same pipette tip, adding them sequentially from low to high concentrations. Use a new pipette to add the sample to be tested in the wells. Place the agar plate in the incubator and incubate for 24-48 h.
4. Results Measurement
Carefully hold up the plate and let the light shine. An opaque precipitate ring around each well can be observed. Measure the diameter of the precipitate ring, plot and fit a standard curve, and calculate the concentration of the unknown antigen from this graph.
Troubleshooting
No precipitate ring
- Agar causes. Check the quality of the agar gel for damage or expired product, which can be replaced promptly. And the agarose gel may dry out during incubation, you should ensure that the chamber is filled with water to prevent the gel from drying out.
- Antibody causes. First, check the quality of the antibody and test the antibody to select the appropriate concentration. High temperature of the agar solution during gel preparation can lead to the inactivation of the antibodies. You should add antibody solution to the agar gel as soon as the appropriate temperature is reached.
- Sample causes. Check each sample well to see if a test sample has been missed. Sample loading should be done directly into the wells without spilling over to the sides to avoid underfilling of the sample. And make sure the sample concentration is not too high or too low.
Blurred precipitation ring
- Agar causes. Uneven distribution of the gel can cause this problem. First, mix the antibody and agar well, then place it on a flat surface for pouring and make sure the plate is not moved until the gel is poured.
- Antibody causes. High temperature at the time of antibody addition may result in inactivation or reduced activity of the antibody.
Oversized or undersized precipitation ring
Too large or too small a precipitation ring can result in inaccurate ring diameter measurements.
- Sample causes. Incorrect test sample volume and too high/low concentration can cause this to occur.
- Temperature causes. Increases/decreases in temperature during incubation can cause over- or under-sizing of the precipitate ring. Therefore, a consistent temperature should be maintained throughout the experiment.
- Instrument causes. You should check the pipette for incorrect calibration and ensure that the correct volume of sample is being aspirated. And check the measuring instrument for accuracy to ensure that the measurements are correct.
Multi-ring
- Sample causes. Sample spoilage may result in multiple precipitation rings, please check sample quality.
- Gel causes. Due to PEG gels, non-specific precipitations that interfere with the results may be produced. The gel material can be changed.
Immunodiffusion is a technique widely used for antigen quantification. Precipitation in the gel is thought to provide more specific and sensitive results than other available methods. If you would like to detect antigen-antibody complexes and determine the relative amount of antigen/antibody, please consider and contact us for immunodiffusion assay services. Or if you would like to learn about various other immunoassay techniques, you can also contact us.
For research use only. Not intended for any clinical use.
Send Inquiry
This site is protected by reCAPTCHA and the Google Privacy Policy and Terms of Service apply.